


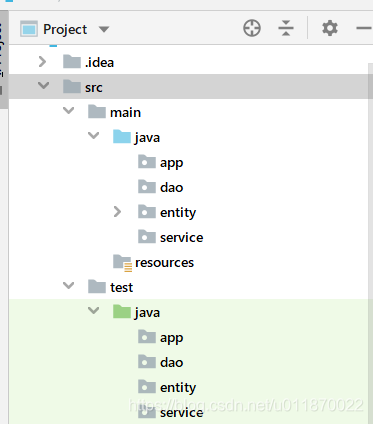
1.创建maven工程,然后创建相应的目录如图:
2.在pom.xml文件中导入项目依赖
<?xml version="1.0" encoding="UTF-8"?>
<project xmlns="http://maven.apache.org/POM/4.0.0"
         xmlns:xsi="http://www.w3.org/2001/XMLSchema-instance"
         xsi:schemaLocation="http://maven.apache.org/POM/4.0.0 http://maven.apache.org/xsd/maven-4.0.0.xsd">
    <modelVersion>4.0.0</modelVersion>

    <groupId>org.example</groupId>
    <artifactId>demo0</artifactId>
    <version>1.0-SNAPSHOT</version>
    <dependencies>
        <!-- 引入mybatis的环境依赖 -->
        <dependency>
            <groupId>org.mybatis</groupId>
            <artifactId>mybatis</artifactId>
            <version>3.5.4</version>
        </dependency>

        <!-- 引入MySQL依赖      -->
        <dependency>
            <groupId>mysql</groupId>
            <artifactId>mysql-connector-java</artifactId>
            <version>8.0.21</version>
        </dependency>
        <!-- 引入junit依赖 -->
        <dependency>
            <groupId>org.junit.jupiter</groupId>
            <artifactId>junit-jupiter-api</artifactId>
            <version>5.7.0-M1</version>
            <scope>test</scope>
        </dependency>

    </dependencies>

</project>
3.创建数据库mybatisdemo,创建User表并插入数据。
创建数据库:
create database if not exists mybatisdemo;创建User表:
create table if not exists user(id int(4) auto_increment primary key,name varchar(16) not null,password varchar(16) not null,age int(3) ,createtime datetime default now());
插入数据:
insert into user(name,password,age,createtime) values('A','A',32,now());
insert into user(name,password,age,createtime) values('B','B',53,now());
insert into user(name,password,age,createtime) values('C','C',87,now());
查询测试:
4.在resources中创建mybatis-config.xml文件并配置mybatis-config.xml
<?xml version="1.0" encoding="UTF-8" ?>
<!DOCTYPE configuration
        PUBLIC "-//mybatis.org//DTD Config 3.0//EN"
        "http://mybatis.org/dtd/mybatis-3-config.dtd">
<configuration>
    <environments default="development">
        <environment id="development">
            <!-- 配置事务类型  -->
            <transactionManager type="JDBC"/>
            <!--   配置连接信息         -->
            <dataSource type="POOLED">
            <!--       配置加载MySQL的驱动         -->
                <property name="driver" value="com.mysql.cj.jdbc.Driver"/>
                <!--      MySQL连接的数据库地址,笔者这里是在本地localhost上测试,并且数据库的名称为mybatisdemo     -->
                <property name="url" value="jdbc:mysql//localhost:3306/mybatisdemo?serverTimezone=UTC"/>
                <!--      MySQL连接的用户名         -->
                <property name="username" value="root"/>
                <!--      MySQL的连接密码        -->
                <property name="password" value="root"/>
            </dataSource>
        </environment>
    </environments>
    <mappers>

    </mappers>
</configuration>
6.在entity包中创建User.java文件对应数据库的User表
package entity;

import java.io.Serializable;
import java.util.Date;

/**
 * Classname:User
 *
 * @description:用户类
 * @author: 陌意随影
 * @Date: 2020-07-24 09:49
 * @Version: 1.0
 **/
public class User implements Serializable {
    //用户ID主键
    private Integer id;
    //用户名
    private String name;
    //密码
    private  String password;
    //年龄
    private  Integer age;
    //创建日期
    private  Date createTime;

    public User() {
    }

    public User(Integer id, String name, String password, Integer age, Date createTime) {
        this.id = id;
        this.name = name;
        this.password = password;
        this.age = age;
        this.createTime = createTime;
    }

    public Integer getId() {
        return id;
    }

    public void setId(Integer id) {
        this.id = id;
    }

    public String getName() {
        return name;
    }

    public void setName(String name) {
        this.name = name;
    }

    public String getPassword() {
        return password;
    }

    public void setPassword(String password) {
        this.password = password;
    }

    public Integer getAge() {
        return age;
    }

    public void setAge(Integer age) {
        this.age = age;
    }

    public Date getCreateTime() {
        return createTime;
    }

    public void setCreateTime(Date createTime) {
        this.createTime = createTime;
    }

    @Override
    public String toString() {
        return "User{" +
                "id=" + id +
                ", name='" + name + '\'' +
                ", password='" + password + '\'' +
                ", age=" + age +
                ", createTime=" + createTime +
                '}';
    }
}
7.在dao包中创建UserDao.java 接口
package dao;

import entity.User;

import java.util.List;

/**
 * Classname:mybatisdemo
 * @description:User的dao接口
 * @author: 陌意随影
 * @Date: 2020-07-24 10:35
 */
public interface UserDao {
    /**
     * @date: 2020/7/24 0024 10:41
     * @description:获取所有的用户信息
     * @return: 返回包含所有的用户的list
     */
    List<User> getAll();


}
8.在mybatis-config.xml的 标签中添加指定配置文件的的位置,更新mybatis-config.xml
<?xml version="1.0" encoding="UTF-8" ?>
<!DOCTYPE configuration
        PUBLIC "-//mybatis.org//DTD Config 3.0//EN"
        "http://mybatis.org/dtd/mybatis-3-config.dtd">
<!--mybatis的主配置文件-->
<configuration>
    <environments default="development">
        <environment id="development">
            <!-- 配置事务类型  -->
            <transactionManager type="JDBC"/>
            <!--   配置连接信息         -->
            <dataSource type="POOLED">
            <!--       配置加载MySQL的驱动         -->
                <property name="driver" value="com.mysql.cj.jdbc.Driver"/>
                <!--      MySQL连接的数据库地址,笔者这里是在本地localhost上测试,并且数据库的名称为mybatisdemo     -->
                <property name="url" value="jdbc:mysql://localhost:3306/mybatisdemo?serverTimezone=UTC"/>
                <!--      MySQL连接的用户名         -->
                <property name="username" value="root"/>
                <!--      MySQL的连接密码        -->
                <property name="password" value="root"/>
            </dataSource>
        </environment>
    </environments>
<!--   指定配置文件的的位置,映射文件指的是每个dao的位置-->
    <mappers>
<!--  指定Userdao的位置-->
        <mapper resource="dao/UserDao.xml"></mapper>
    </mappers>
</configuration>
9.在resources文件夹中添加一个包dao,然后在dao包中新建一个Userdao.xml
<?xml version="1.0" encoding="UTF-8" ?>
<!DOCTYPE mapper
        PUBLIC "-//mybatis.org//DTD Mapper 3.0//EN"
        "http://mybatis.org/dtd/mybatis-3-mapper.dtd">
<!--指定UserDao接口的全限定类名-->
<mapper namespace="dao.UserDao">
<!-- id即为UserDao接口的getAll()函数的方法名-->
    <select id="getAll" resultType="entity.User">
    select * from User
  </select>
</mapper>
PS:.在resources文件夹中添加一个包dao,这是为了使UserDao.java和UserDao.xml两个文件的目录结构相同,这是mybatis的规则,不然会报错。
10.新建一个测试
package dao;

import entity.User;
import org.apache.ibatis.io.Resources;
import org.apache.ibatis.session.SqlSession;
import org.apache.ibatis.session.SqlSessionFactory;
import org.apache.ibatis.session.SqlSessionFactoryBuilder;
import org.junit.jupiter.api.Test;

import java.io.IOException;
import java.io.InputStream;
import java.util.List;

/**
 * Classname:UserDaoTest
 *
 * @description:测试Userdao
 * @author: 陌意随影
 * @Date: 2020-07-24 10:49
 * @Version: 1.0
 **/
public class UserDaoTest {
    @Test
    public void testGetUserAll(){
        try {
            //读取配置文件
            InputStream inputStream = Resources.getResourceAsStream("mybatis-config.xml");
            //实例化SqlSessionFactoryBuilder
            SqlSessionFactoryBuilder sqlSessionFactoryBuilder = new SqlSessionFactoryBuilder();
          //构建SqlSessionFactory
            SqlSessionFactory sqlSessionFactory = sqlSessionFactoryBuilder.build(inputStream);
           //产生一个SqlSession
            SqlSession sqlSession = sqlSessionFactory.openSession();
            //利用SqlSession创建UserDAao的代理对象
            UserDao userDao = sqlSession.getMapper(UserDao.class);
            //利用代理对象执行方法
            List<User> userList = userDao.getAll();
            for (User u:userList ) {
                System.out.println(u);
            }
   //关闭资源
            sqlSession.close();
        } catch (IOException e) {
            e.printStackTrace();
        }
    }
}
完整的目录结构: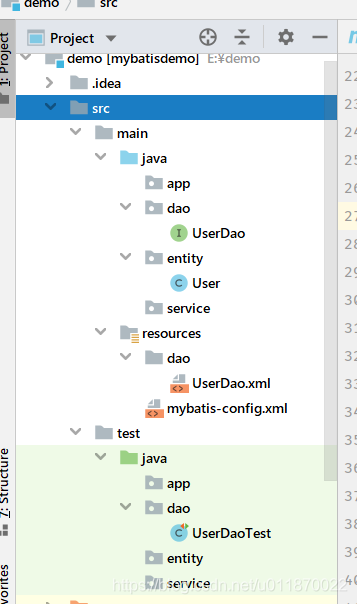
运行截图:
该demo的压缩包地址(解压后直接导入idea即可):http://moyisuiying.com/wp-content/uploads/2020/07/demo0.zip