


1.简介
SSM(Spring+SpringMVC+MyBatis)框架集由Spring、MyBatis两个开源框架整合而成(SpringMVC是Spring中的部分内容)。常作为数据源较简单的web项目的框架。
Spring就像是整个项目中装配bean的大工厂,在配置文件中可以指定使用特定的参数去调用实体类的构造方法来实例化对象。也可以称之为项目中的粘合剂。
Spring的核心思想是IoC(控制反转),即不再需要程序员去显式地new一个对象,而是让Spring框架帮你来完成这一切。
SpringMVC在项目中拦截用户请求,它的核心Servlet即DispatcherServlet承担中介或是前台这样的职责,将用户请求通过HandlerMapping去匹配Controller,Controller就是具体对应请求所执行的操作。SpringMVC相当于SSH框架中struts。
mybatis是对jdbc的封装,它让数据库底层操作变的透明。mybatis的操作都是围绕一个sqlSessionFactory实例展开的。mybatis通过配置文件关联到各实体类的Mapper文件,Mapper文件中配置了每个类对数据库所需进行的sql语句映射。在每次与数据库交互时,通过sqlSessionFactory拿到一个sqlSession,再执行sql命令。
页面发送请求给控制器,控制器调用业务层处理逻辑,逻辑层向持久层发送请求,持久层与数据库交互,后将结果返回给业务层,业务层将处理逻辑发送给控制器,控制器再调用视图展现数据。
在SSM项目中,普遍上将项目分为三层:M(模型层),V(视图层),C(控制层),也就是我们常见的MVC设计模式。
Model(模型)表示应用程序核心(比如数据库记录列表)。
View(视图)显示数据(数据库记录)。
Controller(控制器)处理输入(写入数据库记录)。
MVC 模式同时提供了对 HTML、CSS 和 JavaScript 的完全控制。
Model(模型)是应用程序中用于处理应用程序数据逻辑的部分。通常模型对象负责在数据库中存取数据。
View(视图)是应用程序中处理数据显示的部分。通常视图是依据模型数据创建的。
Controller(控制器)是应用程序中处理用户交互的部分。通常控制器负责从视图读取数据,控制用户输入,并向模型发送数据。
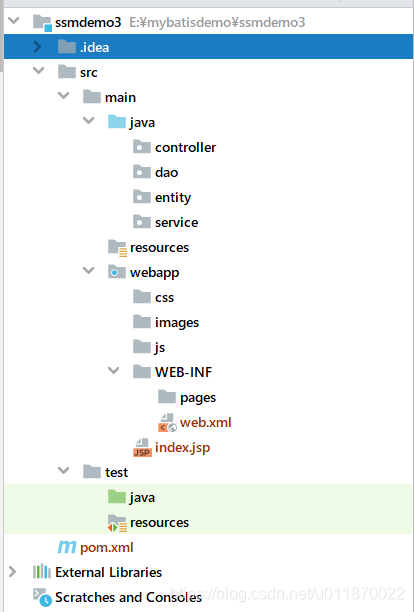
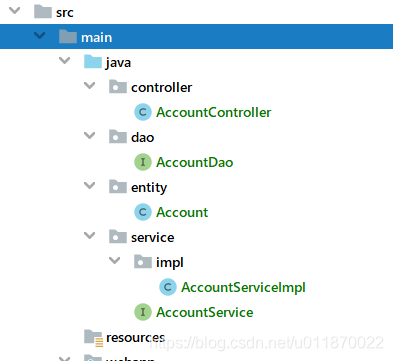
Spring是整合SpringMVC和mybatis的核心,在我们的SSM项目中一般有四个包,分别是:dao,entity,service,controller这四个包,分别对应:持久层,实体类,业务逻辑,控制器。其顺序为: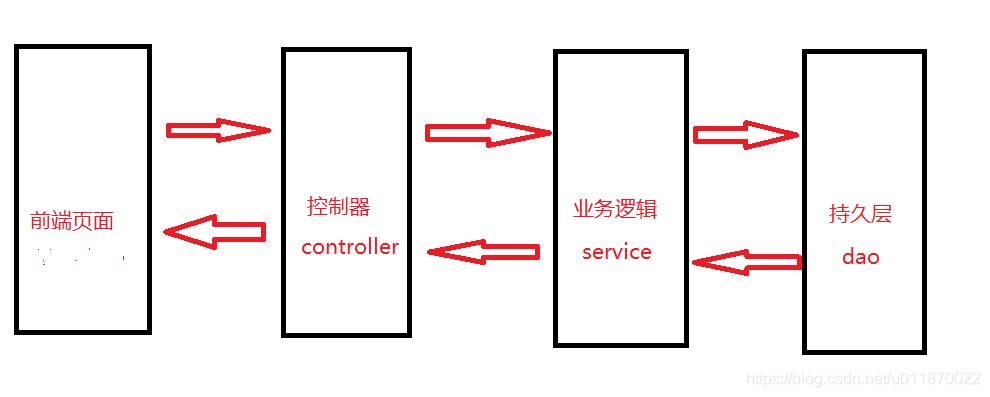

然后ssm中的sprig负责管理service,entity;SpringMVC负责管理controller;mybatis负责管理dao.我们要整合Spring,SpringMVC和mybatis,需要以Spring为核心整合SpringMVC以及mybatis: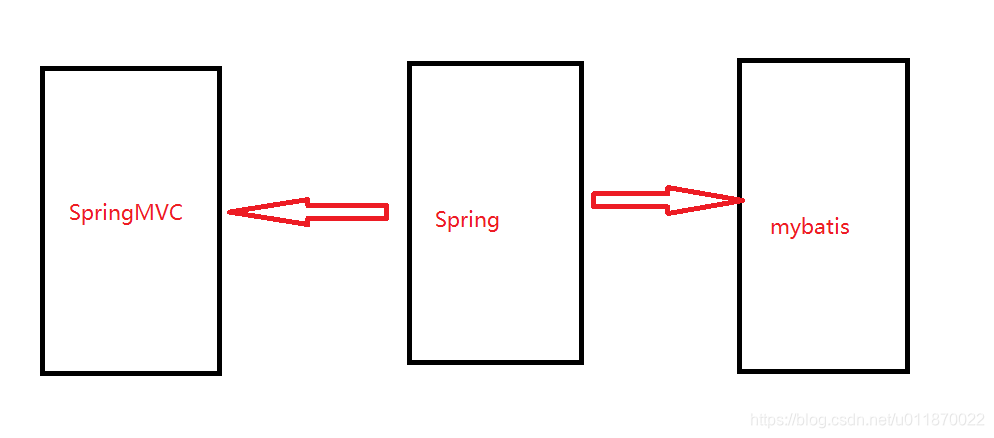
2.SSM项目基本框架的搭建
2.1创建数据库
create database if not exists springdemo;
use springdemo;
create table if not exists Account(id int(4) auto_increment primary key,name varchar(16) not null,password varchar(16) not null,age int(3) ,createtime datetime default now(),money int(8));
2.2首先创建maven工程的webapp项目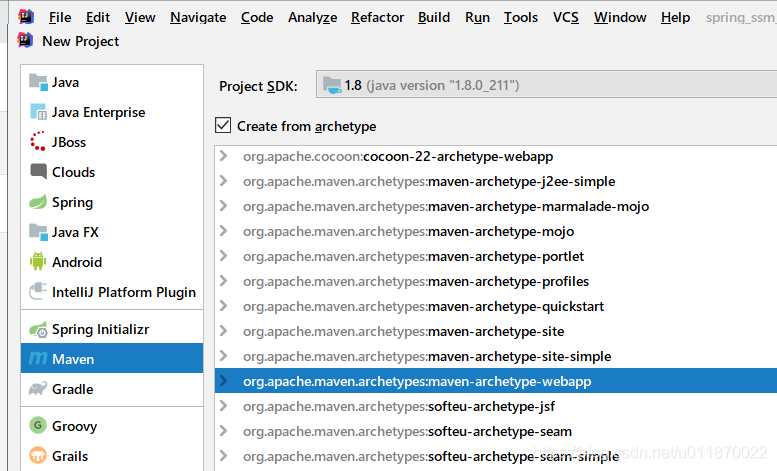
2.3在pom.xml中引入相关依赖
<?xml version="1.0" encoding="UTF-8"?>
<project xmlns="http://maven.apache.org/POM/4.0.0" xmlns:xsi="http://www.w3.org/2001/XMLSchema-instance"
xsi:schemaLocation="http://maven.apache.org/POM/4.0.0 http://maven.apache.org/xsd/maven-4.0.0.xsd">
<modelVersion>4.0.0</modelVersion>
<groupId>org.example</groupId>
<artifactId>ssmdemo3</artifactId>
<version>1.0-SNAPSHOT</version>
<packaging>war</packaging>
<name>ssmdemo3 Maven Webapp</name>
<!-- FIXME change it to the project's website -->
<url>http://www.example.com</url>
<properties>
<!-- 项目编码-->
<project.build.sourceEncoding>UTF-8</project.build.sourceEncoding>
<maven.compiler.source>1.8</maven.compiler.source>
<maven.compiler.target>1.8</maven.compiler.target>
<!-- 用户版本锁定,方便修改版本-->
<spring.version>5.2.8.RELEASE</spring.version>
</properties>
<dependencies>
<!-- 引入JUnit测试依赖-->
<dependency>
<groupId>org.junit.jupiter</groupId>
<artifactId>junit-jupiter-api</artifactId>
<version>5.7.0-M1</version>
<scope>test</scope>
</dependency>
<!-- 引入Spring的依赖-->
<dependency>
<groupId>org.springframework</groupId>
<artifactId>spring-context</artifactId>
<version>${spring.version}</version>
</dependency>
<dependency>
<groupId>org.springframework</groupId>
<artifactId>spring-web</artifactId>
<version>${spring.version}</version>
</dependency>
<dependency>
<groupId>org.springframework</groupId>
<artifactId>spring-tx</artifactId>
<version>${spring.version}</version>
</dependency>
<dependency>
<groupId>org.springframework</groupId>
<artifactId>spring-webmvc</artifactId>
<version>${spring.version}</version>
</dependency>
<dependency>
<groupId>org.springframework</groupId>
<artifactId>spring-tx</artifactId>
<version>5.2.8.RELEASE</version>
</dependency>
<!-- 引入Spring-jdbc依赖包 -->
<dependency>
<groupId>org.springframework</groupId>
<artifactId>spring-jdbc</artifactId>
<version>${spring.version}</version>
</dependency>
<!--引入servlet的依赖包-->
<dependency>
<groupId>javax.servlet</groupId>
<artifactId>servlet-api</artifactId>
<version>2.5</version>
<scope>provided</scope>
</dependency>
<!--引入jsp依赖包-->
<dependency>
<groupId>javax.servlet.jsp</groupId>
<artifactId>jsp-api</artifactId>
<version>2.0</version>
<scope>provided</scope>
</dependency>
<!-- 引入mybatis依赖 -->
<dependency>
<groupId>org.mybatis</groupId>
<artifactId>mybatis</artifactId>
<version>3.5.5</version>
</dependency>
<!-- 引入mybatis的Spring依赖 -->
<dependency>
<groupId>org.mybatis</groupId>
<artifactId>mybatis-spring</artifactId>
<version>2.0.5</version>
</dependency>
<!-- 引入MySQL依赖 -->
<dependency>
<groupId>mysql</groupId>
<artifactId>mysql-connector-java</artifactId>
<version>8.0.21</version>
</dependency>
<!-- 引入c3p0连接池 -->
<dependency>
<groupId>com.mchange</groupId>
<artifactId>c3p0</artifactId>
<version>0.9.5.5</version>
</dependency>
<!-- 引入jstl表达式的依赖包 -->
<dependency>
<groupId>javax.servlet.jsp.jstl</groupId>
<artifactId>jstl</artifactId>
<version>1.2</version>
</dependency>
</dependencies>
<build>
<finalName>ssmdemo3</finalName>
<pluginManagement><!-- lock down plugins versions to avoid using Maven defaults (may be moved to parent pom) -->
<plugins>
<plugin>
<artifactId>maven-clean-plugin</artifactId>
<version>3.1.0</version>
</plugin>
<!-- see http://maven.apache.org/ref/current/maven-core/default-bindings.html#Plugin_bindings_for_war_packaging -->
<plugin>
<artifactId>maven-resources-plugin</artifactId>
<version>3.0.2</version>
</plugin>
<plugin>
<artifactId>maven-compiler-plugin</artifactId>
<version>3.8.0</version>
</plugin>
<plugin>
<artifactId>maven-surefire-plugin</artifactId>
<version>2.22.1</version>
</plugin>
<plugin>
<artifactId>maven-war-plugin</artifactId>
<version>3.2.2</version>
</plugin>
<plugin>
<artifactId>maven-install-plugin</artifactId>
<version>2.5.2</version>
</plugin>
<plugin>
<artifactId>maven-deploy-plugin</artifactId>
<version>2.8.2</version>
</plugin>
</plugins>
</pluginManagement>
</build>
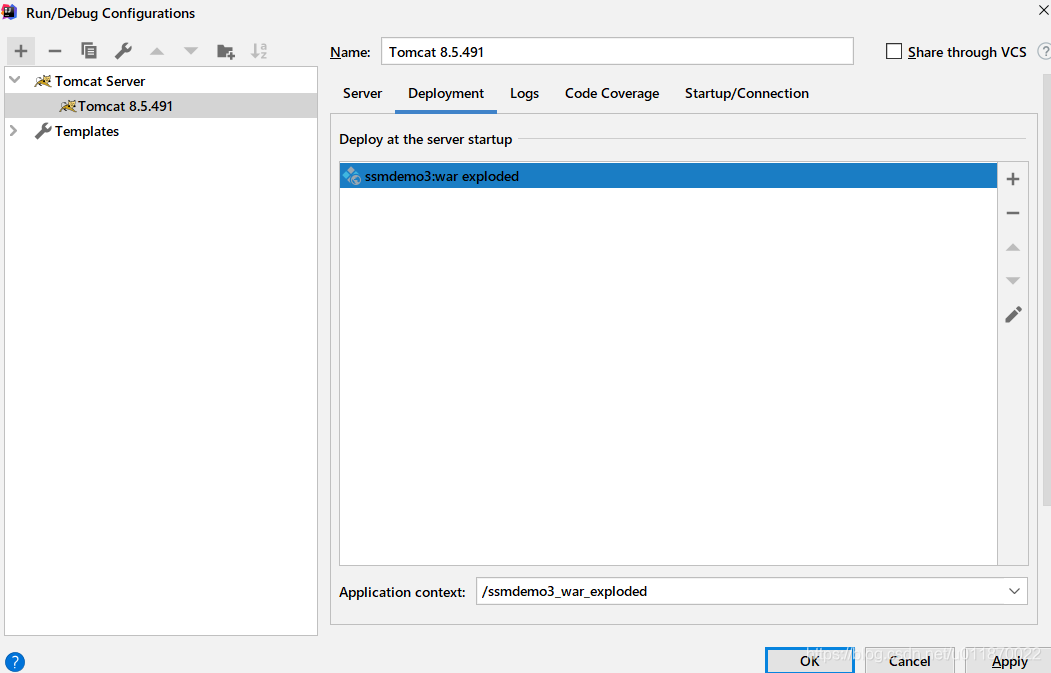
</project>2.4配置tomcat
2.5编写每个包的类对象
2.5.1 entity包
package entity;

/**
 * Classname:Account
 *
 * @description:
 * @author: 陌意随影
 * @Date: 2020-08-12 19:55
 * @Version: 1.0
 **/
@Repository("account")
@Scope("prototype")
public class Account {
    private int id;
    private String name;
    private String password;
    private int age;
    private int money;
 private Date createTime;


    public Date getCreateTime() {
        return createTime;
    }


    public void setCreateTime(Date createTime) {
        this.createTime = createTime;
    }
    public int getId() {
        return id;
    }

    public void setId(int id) {
        this.id = id;
    }

    public String getName() {
        return name;
    }

    public void setName(String name) {
        this.name = name;
    }

    public String getPassword() {
        return password;
    }

    public void setPassword(String password) {
        this.password = password;
    }

    public int getAge() {
        return age;
    }

    public void setAge(int age) {
        this.age = age;
    }

    public int getMoney() {
        return money;
    }

    public void setMoney(int money) {
        this.money = money;
    }

    @Override
    public String toString() {
        return "Account{" +
                "id=" + id +
                ", name='" + name + '\'' +
                ", password='" + password + '\'' +
                ", age=" + age +
                ", money=" + money +
                '}';
    }
}
2.5.2 dao包
package dao;

import entity.Account;
import org.apache.ibatis.annotations.Delete;
import org.apache.ibatis.annotations.Insert;
import org.apache.ibatis.annotations.Select;
import org.apache.ibatis.annotations.Update;

import java.util.List;

/**
 * Classname:AccountDao
 * @description:用于访问数据库,实现对数据库的增删除改操作
 * @author: 陌意随影
 * @Date: 2020-08-12 19:55
 * @Version: 1.0
 **/
 @Repository("accountDao")
public interface AccountDao {
    /**
     * @Description :向数据库中存入新的用户,并返回是否存储成功
     * @Date 19:56 2020/8/12 0012
     * @Param * @param account :要保存的用户
     * @return boolean
     **/
     public  boolean saveAccount(Account account);
     /**
      * @Description :更新用户
      * @Date 19:58 2020/8/12 0012
      * @Param * @param account :
      * @return boolean
      **/
     public boolean updateAccount(Account account);
     /**
      * @Description :通过ID删除用户
      * @Date 19:59 2020/8/12 0012
      * @Param * @param id :
      * @return boolean
      **/
     public  boolean deleteAccount(int id);
     /**
      * @Description :通过用户id查找用户
      * @Date 19:59 2020/8/12 0012
      * @Param * @param id :
      * @return entity.Account
      **/
     public Account findAccount(int id);
     /**
      * @Description :查找所有的用户
      * @Date 20:00 2020/8/12 0012
      * @Param * @param  :
      * @return java.util.List<entity.Account>
      **/
     public List<Account> findAllAccount();
}
2.5.3service包
package service;

import entity.Account;

import java.util.List;

/**
 * Classname:ssmdemo3
 * @description: 用户业务逻辑接口
 * @author: 陌意随影
 * @Date: 2020-08-12 19:55
 */
 @Service("accountService")
public interface AccountService {
    /**
     * @Description :向数据库中存入新的用户,并返回是否存储成功
     * @Date 19:56 2020/8/12 0012
     * @Param * @param account :要保存的用户
     * @return boolean
     **/
    public  boolean saveAccount(Account account);
    /**
     * @Description :更新用户
     * @Date 19:58 2020/8/12 0012
     * @Param * @param account :
     * @return boolean
     **/
    public boolean updateAccount(Account account);
    /**
     * @Description :通过ID删除用户
     * @Date 19:59 2020/8/12 0012
     * @Param * @param id :
     * @return boolean
     **/
    public  boolean deleteAccount(int id);
    /**
     * @Description :通过用户id查找用户
     * @Date 19:59 2020/8/12 0012
     * @Param * @param id :
     * @return entity.Account
     **/
    public Account findAccount(int id);
    /**
     * @Description :查找所有的用户
     * @Date 20:00 2020/8/12 0012
     * @Param * @param  :
     * @return java.util.List<entity.Account>
     **/
    public List<Account> findAllAccount();
}
package service.impl;
import dao.AccountDao;
import entity.Account;
import org.springframework.beans.factory.annotation.Autowired;
import service.AccountService;
import java.util.List;
/**
* Classname:AccountServiceImpl
*
* @description:
* @author: 陌意随影
* @Date: 2020-08-12 20:11
* @Version: 1.0
**/
public class AccountServiceImpl implements AccountService {
//自动注入dao
@Autowired
AccountDao accountDao;
@Override
public boolean saveAccount(Account account) {
return accountDao.saveAccount(account);
}
@Override
public boolean updateAccount(Account account) {
return accountDao.updateAccount(account);
}
@Override
public boolean deleteAccount(int id) {
return accountDao.deleteAccount(id);
}
@Override
public Account findAccount(int id) {
return accountDao.findAccount(id);
}
@Override
public List<Account> findAllAccount() {
return accountDao.findAllAccount();
}
}2.5.4controller包
package controller;

import org.springframework.web.bind.annotation.RequestMapping;

/**
 * Classname:AccountController
 * @description:控制器
 * @author: 陌意随影
 * @Date: 2020-08-12 20:02
 * @Version: 1.0
 **/
 @Controller
@RequestMapping("/account")
public class AccountController {
    @RequestMapping("/testSSM")
    public String testSSM(){
        System.out.println("框架搭建成功!");
        return "sucess";
    }
}
3.创建前端页面
<%--
  Created by IntelliJ IDEA.
  User: 陌意随影
  Date: 2020/8/12 0012
  Time: 20:27
  To change this template use File | Settings | File Templates.
--%>
<%@ page contentType="text/html;charset=UTF-8" language="java" %>
<html>
<head>
    <title>测试页面</title>
</head>
<body>
 <a href="account/testSSM">测试成功页面</a>
</body>
</html>
<%--
Created by IntelliJ IDEA.
User: 陌意随影
Date: 2020/8/12 0012
Time: 20:29
To change this template use File | Settings | File Templates.
--%>
<%@ page contentType="text/html;charset=UTF-8" language="java" %>
<html>
<head>
<title>成功页面</title>
</head>
<body>
<h3>测试成功了。。。。。</h3>
</body>
</html>
4.配置文件
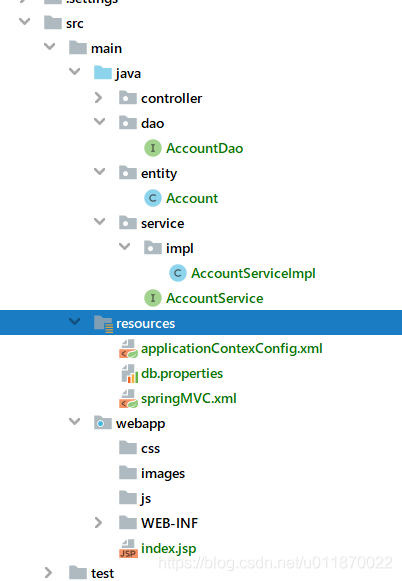
4.1配置Spring的applicationContexConfig.xml
<?xml version="1.0" encoding="UTF-8"?>
<beans xmlns="http://www.springframework.org/schema/beans"
       xmlns:xsi="http://www.w3.org/2001/XMLSchema-instance"
       xmlns:p="http://www.springframework.org/schema/p"
       xmlns:context="http://www.springframework.org/schema/context"
       xsi:schemaLocation="
        http://www.springframework.org/schema/beans
        http://www.springframework.org/schema/beans/spring-beans.xsd
        http://www.springframework.org/schema/context
        http://www.springframework.org/schema/context/spring-context.xsd">
<!--    开启注解扫描-->
  <context:component-scan base-package="service"/>
 <context:component-scan base-package="entity"/>

</beans>
这里只是初步配置了扫描service,entity包下的类
4.2配置springMVC.xml
<?xml version="1.0" encoding="UTF-8"?>
<beans xmlns="http://www.springframework.org/schema/beans"
       xmlns:context="http://www.springframework.org/schema/context"
       xmlns:mvc="http://www.springframework.org/schema/mvc"
       xmlns:xsi="http://www.w3.org/2001/XMLSchema-instance"
       xsi:schemaLocation="
        http://www.springframework.org/schema/beans
        http://www.springframework.org/schema/beans/spring-beans.xsd
        http://www.springframework.org/schema/context
        http://www.springframework.org/schema/context/spring-context.xsd
        http://www.springframework.org/schema/mvc
        http://www.springframework.org/schema/mvc/spring-mvc.xsd">
<!--  开启SpringMVC框架对注解的支持-->
    <mvc:annotation-driven enable-matrix-variables="true"/>
<!--    扫描controller包-->
    <context:component-scan base-package="controller"></context:component-scan>
<!--    配置视图解析器-->
    <bean id="internalResourceViewResolver" class="org.springframework.web.servlet.view.InternalResourceViewResolver">
        <property name="prefix" value="/WEB-INF/pages/"></property>
        <property name="suffix" value=".jsp"></property>
    </bean>
<!--    放行静态资源-->
    <mvc:resources mapping="/js/**" location="/js/"></mvc:resources>
    <mvc:resources mapping="/css/**" location="/css/"></mvc:resources>
    <mvc:resources mapping="/images/**" location="/images/"></mvc:resources>
</beans>
4.3配置web.xml文件
<!DOCTYPE web-app PUBLIC
 "-//Sun Microsystems, Inc.//DTD Web Application 2.3//EN"
 "http://java.sun.com/dtd/web-app_2_3.dtd" >

<web-app>
  <display-name>Archetype Created Web Application</display-name>
<!--  配置读取applicationContexConfig.xml配置文件-->
  <listener>
    <listener-class>org.springframework.web.context.ContextLoaderListener</listener-class>
  </listener>
  <context-param>
    <param-name>contextConfigLocation</param-name>
    <param-value>classpath:applicationContexConfig.xml</param-value>
  </context-param>
<!--  配置前端控制器-->
  <servlet>
    <servlet-name> dispatcherServlet</servlet-name>
    <servlet-class>org.springframework.web.servlet.DispatcherServlet</servlet-class>
<!--    配置启动时加载的资源-->
    <init-param>
      <param-name>contextConfigLocation</param-name>
      <param-value>classpath:springMVC.xml</param-value>
    </init-param>
<!--    启动时加载配置-->
    <load-on-startup>1</load-on-startup>
  </servlet>
  <servlet-mapping>
    <servlet-name>dispatcherServlet</servlet-name>
    <url-pattern>/</url-pattern>
  </servlet-mapping>
<!--  配置字符过滤-->
  <filter>
    <filter-name> characterEncodingFilter</filter-name>
    <filter-class>org.springframework.web.filter.CharacterEncodingFilter</filter-class>
    <init-param>
      <param-name>encoding</param-name>
      <param-value>UTF-8</param-value>
    </init-param>
  </filter>
<!--  对所有的请求都设置为utf-8编码-->
  <filter-mapping>
    <filter-name>characterEncodingFilter</filter-name>
    <url-pattern>/*</url-pattern>
  </filter-mapping>
</web-app>
那么ContextLoaderListener的作用:
ContextLoaderListener的作用就是启动Web容器时,读取在contextConfigLocation中定义的xml文件,自动装配ApplicationContext的配置信息,并产生WebApplicationContext对象,然后将这个对象放置在ServletContext的属性里,这样我们只要得到Servlet就可以得到WebApplicationContext对象,并利用这个对象访问spring容器管理的bean。
简单来说,就是上面这段配置为项目提供了spring支持,初始化了Ioc容器。
4.4配置mybatis的信息
以前我们在mybatis的配置中会单独配置一个文件mybatiConfig.xml来对mybatis进行配置。而在Spring中,为了整合mybatis到Spring中,提供了mybatis-spring这个依赖包,方便我们在Spring中配置mybatis的信息。在applicationContexConfig.xml中添加mybatis的配置信息:
首先创建一个db.properties文件配置数据库连接的信息:
jdbc.username=root
jdbc.password=root
jdbc.driver=com.mysql.cj.jdbc.Driver
jdbc.url=jdbc:mysql://localhost:3306/springdemo?serverTimezone=UTC
然后在applicationContexConfig.xml中导入这个db.properties
<?xml version="1.0" encoding="UTF-8"?>
<beans xmlns="http://www.springframework.org/schema/beans"
       xmlns:xsi="http://www.w3.org/2001/XMLSchema-instance"
       xmlns:p="http://www.springframework.org/schema/p"
       xmlns:context="http://www.springframework.org/schema/context"
       xsi:schemaLocation="
        http://www.springframework.org/schema/beans
        http://www.springframework.org/schema/beans/spring-beans.xsd
        http://www.springframework.org/schema/context
        http://www.springframework.org/schema/context/spring-context.xsd">
<!--    开启注解扫描-->
  <context:component-scan base-package="service"/>
 <context:component-scan base-package="entity"/>
<!--导入db.properties-->
    <context:property-placeholder location="classpath:db.properties"></context:property-placeholder>
<!--    配置数据源-->
    <bean  id="dataSource" class="com.mchange.v2.c3p0.ComboPooledDataSource">
        <property name="driverClass" value="${jdbc.driver}"></property>
        <property name="user" value="${jdbc.username}"></property>
        <property name="password" value="${jdbc.password}"></property>
        <property name="jdbcUrl" value="${jdbc.url}"></property>
    </bean>
<!--    配置SqlSessionFactoryBean-->
    <bean id="sqlSessionFactory" class="org.mybatis.spring.SqlSessionFactoryBean">
        <property name="dataSource" ref="dataSource"></property>
    </bean>
<!--    配置dao接口所在的位置,这里采用的注解配置mybatis的dao接口-->
    <bean class="org.mybatis.spring.mapper.MapperScannerConfigurer" id="mapperScannerConfigurer">
        <property name="basePackage" value="dao"></property>
    </bean>
</beans>
5.给dao的接口编写mybatis的sql注解语句
package dao;

import entity.Account;
import org.apache.ibatis.annotations.Delete;
import org.apache.ibatis.annotations.Insert;
import org.apache.ibatis.annotations.Select;
import org.apache.ibatis.annotations.Update;
import org.springframework.stereotype.Repository;

import java.util.List;

/**
 * Classname:AccountDao
 * @description:用于访问数据库,实现对数据库的增删除改操作
 * @author: 陌意随影
 * @Date: 2020-08-12 19:55
 * @Version: 1.0
 **/
@Repository("accountDao")
public interface AccountDao {
    /**
     * @Description :向数据库中存入新的用户,并返回是否存储成功
     * @Date 19:56 2020/8/12 0012
     * @Param * @param account :要保存的用户
     * @return boolean
     **/
    @Insert("insert into account(name,password,age,createTime,money) values(#{name},#{password},#{age},#{createTime},#{money}")
     public  boolean saveAccount(Account account);
     /**
      * @Description :更新用户
      * @Date 19:58 2020/8/12 0012
      * @Param * @param account :
      * @return boolean
      **/
     @Update("update account set name=#{name},password=#{password},age=#{age},createTime=#{createTime},money=#{money}")
     public boolean updateAccount(Account account);
     /**
      * @Description :通过ID删除用户
      * @Date 19:59 2020/8/12 0012
      * @Param * @param id :
      * @return boolean
      **/
     @Delete("delete from account where id=#{id}")
     public  boolean deleteAccount(int id);
     /**
      * @Description :通过用户id查找用户
      * @Date 19:59 2020/8/12 0012
      * @Param * @param id :
      * @return entity.Account
      **/
     @Select("select* from account where id=#{id}")
     public Account findAccount(int id);
     /**
      * @Description :查找所有的用户
      * @Date 20:00 2020/8/12 0012
      * @Param * @param  :
      * @return java.util.List<entity.Account>
      **/
     @Select("select* from account")
     public List<Account> findAllAccount();
}
6.到此ssm的框架基本配置完成,下面我们进行简单的测试
启动Tomcat:
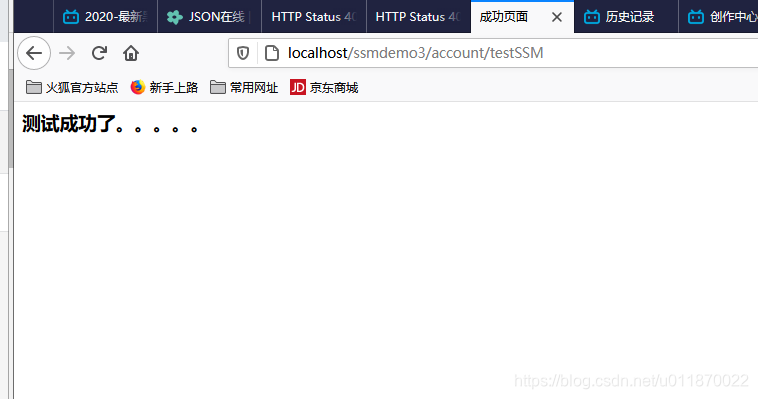
该项目初步测试成功。有关详细的测试请看:http://moyisuiying.com/index.php/javastudy/254.html
7.该项目的源代码已经上传到个人博客,如有需要请自行移步下载(解压后导入idea即可):http://moyisuiying.com/wp-content/uploads/2020/08/ssmdemo3.rar