


1.在我们进行数据库操作时,为了存取数据的安全,需要进行事务支持,下面我们先看一下MySQL的事务:
1.1MySQL 事务主要用于处理操作量大,复杂度高的数据。比如说,在人员管理系统中,你删除一个人员,你既需要删除人员的基本资料,也要删除和该人员相关的信息,如信箱,文章等等,这样,这些数据库操作语句就构成一个事务!
1.2在 MySQL 中只有使用了 Innodb 数据库引擎的数据库或表才支持事务。
事务处理可以用来维护数据库的完整性,保证成批的 SQL 语句要么全部执行,要么全部不执行。
1.3事务用来管理 insert,update,delete 语句.
1.4一般来说,事务是必须满足4个条件(ACID)::原子性(Atomicity,或称不可分割性)、一致性(Consistency)、隔离性(Isolation,又称独立性)、持久性(Durability)。
1.4.1原子性:一个事务(transaction)中的所有操作,要么全部完成,要么全部不完成,不会结束在中间某个环节。事务在执行过程中发生错误,会被回滚(Rollback)到事务开始前的状态,就像这个事务从来没有执行过一样。
1.4.2一致性:在事务开始之前和事务结束以后,数据库的完整性没有被破坏。这表示写入的资料必须完全符合所有的预设规则,这包含资料的精确度、串联性以及后续数据库可以自发性地完成预定的工作。
1.4.3隔离性:数据库允许多个并发事务同时对其数据进行读写和修改的能力,隔离性可以防止多个事务并发执行时由于交叉执行而导致数据的不一致。事务隔离分为不同级别,包括读未提交(Read uncommitted)、读提交(read committed)、可重复读(repeatable read)和串行化(Serializable)。
1.4.5持久性:事务处理结束后,对数据的修改就是永久的,即便系统故障也不会丢失。
2.为什么需要事务
举个简单的例子:假设我在银行中的账户中有1000块钱,而我女朋友的账号余额为0,我现在想把这1000块钱转给我的女朋友,这时银行系统在后端操作数据库存取数据时的大致操作分为两步:(1)从数据库中将我的银行存款金额从1000置为0.(2)从数据库中将我女朋友的银行账户余额从0置为1000.
按照正常的流程,如果不出现意外,那么会成功转账,我账户的余额为0,我女朋友的账户余额为1000.但是,如果在我转账的过程中服务器发生了错误,并且刚好在步骤(1)和(2)之间发生了故障,导致步骤(2)无法执行,那么这时候造成的结果就是我的账户余额从1000变为0了,但是我女朋友的账户余额还是0,这1000块钱没有转到我女朋友的账户里,被银行给“吃了”。所以为了安全,我们需要将转账步骤(1)和(2)看成一个整体,也就是看成一个事务,当其中的任何一个步骤出现了错误,该事务都不会提交,直接回滚,这样就不会出现我转账时我的账号金额从1000变为0了,而我的女朋友的账号还是0的现象 。这时候要么我的账号是1000,女朋友的账号是0,要么是我的账户是0,我女朋友的账户是1000,这就保证了我银行账号的安全。
3.在Spring中是支持事务管理的,我们只需要配置好对应的文件就可以了。为了更加深入学习和探究Spring的事务管理,此次实现自定义Spring的事务管理。
3.1建立数据库,并建立Account表单
create database if not exists springdemo;
use springdemo;
create table if not exists Account(id int(4) auto_increment primary key,name varchar(16) not null,password varchar(16) not null,age int(3) ,createtime datetime default now(),money int(8));
3.2在maven中创建一个项目。
3.3在pom.xml中引入依赖文件
<?xml version="1.0" encoding="UTF-8"?>
<project xmlns="http://maven.apache.org/POM/4.0.0"
         xmlns:xsi="http://www.w3.org/2001/XMLSchema-instance"
         xsi:schemaLocation="http://maven.apache.org/POM/4.0.0 http://maven.apache.org/xsd/maven-4.0.0.xsd">
    <modelVersion>4.0.0</modelVersion>

    <groupId>org.example</groupId>
    <artifactId>springdemo4</artifactId>
    <version>1.0-SNAPSHOT</version>
    <dependencies>
<!--        引入MySQL的依赖文件-->
        <dependency>
            <groupId>mysql</groupId>
            <artifactId>mysql-connector-java</artifactId>
            <version>8.0.21</version>
        </dependency>
<!--        引入Spring的依赖文件-->
        <dependency>
            <groupId>org.springframework</groupId>
            <artifactId>spring-core</artifactId>
            <version>5.2.8.RELEASE</version>
        </dependency>
        <!-- https://mvnrepository.com/artifact/org.springframework/spring-context -->
        <dependency>
            <groupId>org.springframework</groupId>
            <artifactId>spring-context</artifactId>
            <version>5.2.8.RELEASE</version>
        </dependency>
        <!-- 引入jdbc连接数据库的工具依赖,用于访问数据库提供便利操作 -->
        <dependency>
            <groupId>commons-dbutils</groupId>
            <artifactId>commons-dbutils</artifactId>
            <version>1.7</version>
        </dependency>
        <!--引入c3p0数据库连接池-->
        <dependency>
            <groupId>com.mchange</groupId>
            <artifactId>c3p0</artifactId>
            <version>0.9.5.5</version>
        </dependency>
<!--       引入测试依赖-->
        <dependency>
            <groupId>org.junit.jupiter</groupId>
            <artifactId>junit-jupiter</artifactId>
            <version>RELEASE</version>
            <scope>test</scope>
        </dependency>

    </dependencies>

</project>
4.开始编写代码
4.1在entity包中开始编写Account实体类。
package entity;

import org.springframework.context.annotation.Scope;
import org.springframework.stereotype.Repository;

import java.util.Date;

/**
 * Classname:Account
 *
 * @description:
 * @author: 陌意随影
 * @Date: 2020-08-01 17:33
 * @Version: 1.0
 **/
public class Account {
    //用户主键ID
    private int id;
    //用户名
    private String name;
    //用户密码
    private String password;
    //用户年龄
    private int age;
    //用户创建时间
    private Date createTime ;
    //用户的余额
    private int money;

    public int getMoney() {
        return money;
    }

    public void setMoney(int money) {
        this.money = money;
    }

    public int getId() {
        return id;
    }

    public void setId(int id) {
        this.id = id;
    }

    public String getName() {
        return name;
    }

    public void setName(String name) {
        this.name = name;
    }

    public String getPassword() {
        return password;
    }

    public void setPassword(String password) {
        this.password = password;
    }

    public int getAge() {
        return age;
    }

    public void setAge(int age) {
        this.age = age;
    }

    public Date getCreateTime() {
        return createTime;
    }

    public void setCreateTime(Date createTime) {
        this.createTime = createTime;
    }

    @Override
    public String toString() {
        return "Account{" +
                "id=" + id +
                ", name='" + name + '\'' +
                ", password='" + password + '\'' +
                ", age=" + age +
                ", createTime=" + createTime +
                ", monney=" + money +
                '}';
    }
}
4.2在dao包中编写AccountDao接口
package dao;

import entity.Account;

import java.util.List;

/**
 * Classname:springdemo3
 *
 * @description:{description}
 * @author: 陌意随影
 * @Date: 2020-08-01 17:32
 */
public interface AccountDao {
    /**
     * @Description :保存用户
     * @Date 11:51 2020/8/9 0009
     * @Param * @param account :
     * @return boolean
     **/
    public boolean saveAccount(Account account);
    /**
     * @Description :更新用户
     * @Date 11:51 2020/8/9 0009
     * @Param * @param newAccount :
     * @return boolean
     **/
    public boolean updateAccount(Account newAccount);
    /**
     * @Description :通过ID删除用户
     * @Date 11:52 2020/8/9 0009
     * @Param * @param id :
     * @return boolean
     **/
    public boolean deleteAccountById(int id);
    /**
     * @Description :通过ID查询用户
     * @Date 11:52 2020/8/9 0009
     * @Param * @param id :
     * @return entity.Account
     **/
    public Account findAccountById(int id);
    /**
     * @Description :查找所有用户
     * @Date 11:52 2020/8/9 0009
     * @Param * @param  :
     * @return java.util.List<entity.Account>
     **/
    public List<Account> findAll();
}
4.3在service包中创建AccountService接口
package service;

import entity.Account;

import java.util.List;

/**
 * Classname:springdemo3
 *
 * @description:{description}
 * @author: 陌意随影
 * @Date: 2020-08-01 17:35
 */
public interface AccountService {
        /**
         * @Description :保存用户
         * @Date 11:51 2020/8/9 0009
         * @Param * @param account :
         * @return boolean
         **/
        public boolean saveAccount(Account account);
        /**
         * @Description :更新用户
         * @Date 11:51 2020/8/9 0009
         * @Param * @param newAccount :
         * @return boolean
         **/
        public boolean updateAccount(Account newAccount);
        /**
         * @Description :通过ID删除用户
         * @Date 11:52 2020/8/9 0009
         * @Param * @param id :
         * @return boolean
         **/
        public boolean deleteAccountById(int id);
        /**
         * @Description :通过ID查询用户
         * @Date 11:52 2020/8/9 0009
         * @Param * @param id :
         * @return entity.Account
         **/
        public Account findAccountById(int id);
        /**
         * @Description :查找所有用户
         * @Date 11:52 2020/8/9 0009
         * @Param * @param  :
         * @return java.util.List<entity.Account>
         **/
        public List<Account> findAll();
   /**
    * @Description :从用户ID为sourceId的用户向用户ID为targetId的用户转账money
    * @Date 11:55 2020/8/9 0009
    * @Param * @param sourceId
    * @param targetId
    * @param money :
    * @return boolean
    **/
    public boolean tranferMoney(int sourceId,int targetId,int money);
}
5.开始书写事务支持工具类
5.1在util包中新建DataConnectionUtil.java
package util;

import javax.sql.DataSource;
import java.sql.Connection;
import java.sql.SQLException;

/**
 * Classname:DataConnectionUtil
 *
 * @description:
 * @author: 陌意随影
 * @Date: 2020-08-02 12:52
 * @Version: 1.0
 **/
public class DataConnectionUtil {
    //线程局部变量,同一个 ThreadLocal 所包含的对象,在不同的 Thread 中有不同的副本,用于防止多线程共享,从而更加安全
    private static ThreadLocal<Connection> threadLocal=new ThreadLocal<Connection>();
    //数据库的数据源
    private DataSource dataSource ;
  //用户在配置文件中注入数据源
    public void setDataSource(DataSource dataSource) {
        this.dataSource = dataSource;
    }
  /**
   * @Description :获取数据库连接
   * @Date 12:00 2020/8/9 0009
   * @Param * @param  :
   * @return java.sql.Connection
   **/
    public Connection getConnection(){
        //从获取连接
        Connection connection = threadLocal.get();
        if (connection == null){
            //尚未有连接
            try {
                //从数据源中获取一个连接
                connection = dataSource.getConnection();
                //将该连接设置到线程局部变量中
                threadLocal.set(connection);
                return connection;
            } catch (SQLException e) {
               throw  new RuntimeException("获取数据库连接错误!");
            }
        }
        return connection;
    }
    /**
     * @Description :从线程局部变量中移除已经绑定的连接对象
     * @Date 12:04 2020/8/9 0009
     * @Param * @param  :
     * @return void
     **/
 public void removeConnection(){
        threadLocal.remove();
 }
}
在获取线程连接的过程中,我们将从数据源DataSource获取的连接对象保存到局部线程变量ThreadLocal中。对于ThreadLocal,有以下特点:
ThreadLoal 变量,线程局部变量,同一个 ThreadLocal 所包含的对象,在不同的 Thread 中有不同的副本。这里有几点需要注意:
因为每个 Thread 内有自己的实例副本,且该副本只能由当前 Thread 使用。这是也是 ThreadLocal 命名的由来。既然每个 Thread 有自己的实例副本,且其它 Thread 不可访问,那就不存在多线程间共享的问题。ThreadLocal 提供了线程本地的实例。它与普通变量的区别在于,每个使用该变量的线程都会初始化一个完全独立的实例副本。ThreadLocal 变量通常被private static修饰。当一个线程结束时,它所使用的所有 ThreadLocal 相对的实例副本都可被回收。总的来说,ThreadLocal 适用于每个线程需要自己独立的实例且该实例需要在多个方法中被使用,也即变量在线程间隔离而在方法或类间共享的场景。
5.2创建事务管理的TransactionManager.java
package util;

import java.sql.SQLException;

/**
 * Classname:TransactionManager
 *
 * @description:
 * @author: 陌意随影
 * @Date: 2020-08-02 13:00
 * @Version: 1.0
 **/
public class TransactionManager {
    //数据库连接工具获取连接
   private DataConnectionUtil dataConnectionUtil ;
   /**
    * @Description :用于在配置文件中注入DataConnectionUtil
    * @Date 12:11 2020/8/9 0009
    * @Param * @param dataConnectionUtil :
    * @return void
    **/
    public void setDataConnectionUtil(DataConnectionUtil dataConnectionUtil) {
        this.dataConnectionUtil = dataConnectionUtil;
    }
   /**
    * @Description :开始事务
    * @Date 12:12 2020/8/9 0009
    * @Param * @param  :
    * @return void
    **/
    public void beginTransaction(){
       try {
           //将数据流连接Connection对象设置为禁止自动提交,改为手动提交
           dataConnectionUtil.getConnection().setAutoCommit(false);
       } catch (SQLException e) {
           e.printStackTrace();
       }
   }
   /**
    * @Description :提交事务,当所有操作步骤都正确无误时手动提交事务
    * @Date 12:12 2020/8/9 0009
    * @Param * @param  :
    * @return void
    **/
 public  void commit(){
     try {
         //提交事务
         dataConnectionUtil.getConnection().commit();
     } catch (SQLException e) {
         e.printStackTrace();
     }
 }
 /**
  * @Description :回滚事务。当数据库操作过程中任何一个步骤出现问题便回滚事务
  * @Date 12:13 2020/8/9 0009
  * @Param * @param  :
  * @return void
  **/
 public void rollback(){
     try {
         //回滚事务
         dataConnectionUtil.getConnection().rollback();
     } catch (SQLException e) {
         e.printStackTrace();
     }
 }
 /**
  * @Description :释放资源
  * @Date 12:14 2020/8/9 0009
  * @Param * @param  :
  * @return void
  **/
 public void release(){
     //移除Connection对象
       dataConnectionUtil.removeConnection();
 }
}
6.书写业务逻辑和持久层代码
6.1在dao包中新建AccountDao的实现类AccountDaoImpl.java
package dao;

import entity.Account;
import org.apache.commons.dbutils.QueryRunner;
import org.apache.commons.dbutils.handlers.BeanHandler;
import org.apache.commons.dbutils.handlers.BeanListHandler;
import org.springframework.stereotype.Repository;
import util.DataConnectionUtil;

import java.sql.SQLException;
import java.util.List;

/**
 * Classname:AccountDaoImpl
 *
 * @description:AccountDao的实现类
 * @author: 陌意随影
 * @Date: 2020-08-01 17:32
 * @Version: 1.0
 **/
public class AccountDaoImpl implements AccountDao {
    //用于进行MySQL增删查改
    QueryRunner queryRunner = null;
  //    自定义数据连接工具
    DataConnectionUtil dataConnectionUtil;
    /**
     * @Description :方便在配置文件中注入QueryRunner对象
     * @Date 12:16 2020/8/9 0009
     * @Param * @param queryRunner :
     * @return void
     **/
    public void setQueryRunner(QueryRunner queryRunner) {
        this.queryRunner = queryRunner;
    }
 /**
  * @Description :方便在配置文件中注入DataConnectionUtil对象
  * @Date 12:17 2020/8/9 0009
  * @Param * @param dataConnectionUtil :
  * @return void
  **/
    public void setDataConnectionUtil(DataConnectionUtil dataConnectionUtil) {
        this.dataConnectionUtil = dataConnectionUtil;
    }
   /**
    * @Description :保存用户
    * @Date 12:17 2020/8/9 0009
    * @Param * @param newAccount :
    * @return boolean
    **/
    public boolean saveAccount(Account newAccount) {
        try {
            return queryRunner.update(dataConnectionUtil.getConnection(),"insert into account(name,password,age,createTIme,money) values(?,?,?,?,?)",
                    newAccount.getName(),newAccount.getPassword(),
                    newAccount.getAge(),newAccount.getCreateTime(),newAccount.getMoney())== 1;
        } catch (SQLException e) {
            e.printStackTrace();
        }finally {
            return  false;
        }
    }
  /**
   * @Description :更新用户
   * @Date 12:18 2020/8/9 0009
   * @Param * @param newAccount :
   * @return boolean
   **/
    public boolean updateAccount(Account newAccount) {
        try {
            return queryRunner.update(dataConnectionUtil.getConnection(),"update account set name=?,password=?,age=?,createTime=?,money=? where id=?",
                    newAccount.getName(),newAccount.getPassword(),
                    newAccount.getAge(),newAccount.getCreateTime(),newAccount.getMoney(),newAccount.getId())==1;
        } catch (SQLException e) {
            e.printStackTrace();
        }finally {
            return  false;
        }
    }
  /**
   * @Description :通过ID删除用户
   * @Date 12:18 2020/8/9 0009
   * @Param * @param id :
   * @return boolean
   **/
    public boolean deleteAccountById(int id) {
        try {
            return queryRunner.update(dataConnectionUtil.getConnection(),"delete from account where id=?",id) == 1;
        } catch (SQLException e) {
            e.printStackTrace();
        }finally {
            return  false;
        }
    }
/**
 * @Description :通过ID查询用户
 * @Date 11:02 2020/8/9 0009
 * @Param * @param id :
 * @return entity.Account
 **/
    public Account findAccountById(int id) {
        Account account;
        try {
         account = queryRunner.query(dataConnectionUtil.getConnection(),"select* from account where id=?", new BeanHandler<Account>(Account.class), id);
         return  account;
        } catch (SQLException e) {
            e.printStackTrace();
        }
            return  null;

    }
/**
 * @Description :查询所有哟用户
 * @Date 11:01 2020/8/9 0009
 * @Param * @param  :
 * @return java.util.List<entity.Account>
 **/
    public List<Account> findAll() {
        try {
            return queryRunner.query(dataConnectionUtil.getConnection(),"select* from account",new BeanListHandler<Account>(Account.class));
        } catch (SQLException e) {
            e.printStackTrace();
        }
            return  null;

    }

}
6.2在service包中新建AccountService的实现来AccountServiceImpl.java
package service;
import dao.AccountDao;
import entity.Account;
import java.util.List;
/**
 * Classname:AccountServiceImpl
 * @description:
 * @author: 陌意随影
 * @Date: 2020-08-01 17:35
 * @Version: 1.0
 **/
public class AccountServiceImpl implements AccountService {
    //用户数据可访问的Dao接口
    private AccountDao accountDao;
    /**
     * @Description :方便在配置文件中注入AccountDao的实现了AccountDaoImpl
     * @Date 12:21 2020/8/9 0009
     * @Param * @param accountDao :
     * @return void
     **/
    public void setAccountDao(AccountDao accountDao) {
        this.accountDao = accountDao;
    }
    public boolean saveAccount(Account account) {
        return accountDao.saveAccount(account);
    }

    public boolean updateAccount(Account newAccount) {
        return accountDao.updateAccount(newAccount);
    }

    public boolean deleteAccountById(int id) {
        return accountDao.deleteAccountById(id);
    }

    public Account findAccountById(int id) {
        return accountDao.findAccountById(id);
    }

    public List<Account> findAll() {
        return accountDao.findAll();
    }
    /**
     * @Description :从用户ID为sourceId的用户向用户ID为targetId的用户转账money
     * @Date 11:55 2020/8/9 0009
     * @Param * @param sourceId
     * @param targetId
     * @param money :
     * @return boolean
     **/
    public boolean tranferMoney(int sourceId, int targetId, int money) {
           //获取sourceId对应的用户
            Account sourceAccount = this.findAccountById(sourceId);
        //获取targetId对应的用户
            Account targetAccount = this.findAccountById(targetId);
            //转账失败
            if (sourceAccount == null || targetAccount == null) {
                return  false;
            }
            //转账者扣去转账的金额
            sourceAccount.setMoney(sourceAccount.getMoney() -money);
            //目标对象加上获取的转账金额
            targetAccount.setMoney(targetAccount.getMoney()+money);
            //更新转账者的账户
        boolean b = this.updateAccount(sourceAccount);
        //更新转账目标者的账户
        boolean b1 = this.updateAccount(targetAccount);
            return  b == true && b1 == true;

    }
}
7.我们已经写好了对用户访问的实体类,与数据库打交道的dao,以及业务逻辑的Service,但是我们现在还没有真正和事务管理扯上关系。我们负责对事务的管理时是要在业务逻辑这里进行事务的控制。因此要对AccountServiceImpl进行事务的管理。那么我们该如何进行管理呢?
我们首先想到最简单的管理方法:
 /**
     * @Description :从用户ID为sourceId的用户向用户ID为targetId的用户转账money
     * @Date 11:55 2020/8/9 0009
     * @Param * @param sourceId
     * @param targetId
     * @param money :
     * @return boolean
     **/
    public boolean tranferMoney(int sourceId, int targetId, int money) {
        try {
            //开始事务
            transactionManager.beginTransaction();
           //获取sourceId对应的用户
            Account sourceAccount = this.findAccountById(sourceId);
        //获取targetId对应的用户
            Account targetAccount = this.findAccountById(targetId);
            //转账失败
            if (sourceAccount == null || targetAccount == null) {
                return  false;
            }
            //转账者扣去转账的金额
            sourceAccount.setMoney(sourceAccount.getMoney() -money);
            //目标对象加上获取的转账金额
            targetAccount.setMoney(targetAccount.getMoney()+money);
            //更新转账者的账户
        boolean b = this.updateAccount(sourceAccount);
        //更新转账目标者的账户
        boolean b1 = this.updateAccount(targetAccount);
        //提交事务
        transactionManager.commit();
            return  b == true && b1 == true;

        }catch (Exception e){
             e.printStackTrace();
             //回滚事务
             transactionManager.rollback();

        }
        //释放资源
        transactionManager.release();
        return  false;
    }
我们在AccountServiceImpl内部进行对事务的管理,拿 tranferMoney(int sourceId, int targetId, int money)函数为例,对事务的管理经历:1.beginTransaction开始事务;
2.是否有异常?
2.1步骤全都正常则commit提交事务
2.2步骤中存在异常则rollback回滚事务。
3.release释放Connection对象。
显然这是很好理解的事务管理方式,但是我们可以看到在AccountServiceImpl中还有很多个其它的方法,比如saveAccount(Account account),updateAccount(Account newAccount)等这些方法,要是我们每个方法都像tranferMoney(int sourceId, int targetId, int money)函数一样进行事务管理,那么显然代码会冗余重复,很不友好。由于这几个步骤都是一致的,首先开始事务,其次如果没有异常则提交事务,有异常则回滚事务,最后是释放事务。我们可以根据这个执行规律,使用动态代理的方式对AccountServiceImpl中的每个与数据库打交道的方法进行增强,从而减少了代码的冗余。
8.在factory包中新建一个BeanFactory.java使用动态代理对AccountServiceImpl的业务逻辑进行增强。
package factory;

import service.AccountService;
import util.TransactionManager;
import java.lang.reflect.InvocationHandler;
import java.lang.reflect.Method;
import java.lang.reflect.Proxy;

/**
 * Classname:BeanFactory
 *
 * @description:
 * @author: 陌意随影
 * @Date: 2020-08-02 15:47
 * @Version: 1.0
 **/
public class BeanFactory {
    //使用AccountServiceImpl的父接口,作为被代理的接口
   private     AccountService accountService ;
   //事务管理
    private TransactionManager transactionManager;
   /**
    * @Description :方便在配置文件中进行注入AccountServiceImpl
    * @Date 13:03 2020/8/9 0009
    * @Param * @param accountService :
    * @return void
    **/
    public void setAccountService(AccountService accountService) {
        this.accountService = accountService;
    }
   /**
    * @Description :方便在配置文件中注入TransactionManager
    * @Date 13:03 2020/8/9 0009
    * @Param * @param transactionManager :
    * @return void
    **/
    public void setTransactionManager(TransactionManager transactionManager) {
        this.transactionManager = transactionManager;
    }
    /**
     * @Description :返回一个经过动态代理增强后的AccountService对象,实际上是对AccountServiceImpl进行增强后返回其父接口,面向接口编程
     * @Date 13:03 2020/8/9 0009
     * @Param * @param  :
     * @return service.AccountService
     **/
   public  AccountService AccountServiceInstance(){
       Object proxyInstance = Proxy.newProxyInstance(accountService.getClass().getClassLoader(),
               accountService.getClass().getInterfaces(),
               new InvocationHandler() {
          /**
           * @Description :通过动态代理对accountService的方法进行增强
           * @Date 13:05 2020/8/9 0009
           * @Param * @param proxy  被代理的对象,也就是accountService
           * @param method :需要增强的方法
           * @param args :方法中的实际参数数组
           * @return java.lang.Object
           **/
           public Object invoke(Object proxy, Method method, Object[] args) throws Throwable {
               Object value = null;
               try {
                   //开始事务
                   transactionManager.beginTransaction();
                   //调用该方法并返回结果
                   value = method.invoke(accountService, args);
                   //提交事务
                 transactionManager.commit();

               }catch (Exception e){
                   transactionManager.rollback();
                   e.printStackTrace();
               }finally {
                   transactionManager.release();
               }
               return  value;
           }
       });
       return (AccountService) proxyInstance;
   }

}
该类中的private AccountService accountService实际上通过set方法从外部注入一个AccountService的实现类AccountServiceImpl后,accountService实际上就是一个AccountServiceImpl,不过,在动态代理中,需要使用到接口的数组,所以我们需要使用AccountServiceImpl的父接口 AccountService作为参数变量accountService,然后在 AccountServiceInstance()中利用动态代理进行增强AccountServiceImpl。
动态代理的方法解析:
public static Object newProxyInstance(ClassLoader loader,
Class[] interfaces,
InvocationHandler h)
参数 :
loader - 类加载器来定义代理类
interfaces - 要实现的代理类的接口列表
h - 调度方法调用的调用处理函数
结果 :具有由指定的类加载器定义并实现指定接口的代理类的指定调用处理程序的代理实例。
在本次测试中,实现的代理类的接口列表是AccountService 中的所有方法。如果想要独胆代理某些方法而不是所有的方法,可以从 accountService.getClass().getInterfaces()接口数组中选择自己想要加强的接口。
9.配置bean.xml文件
<?xml version="1.0" encoding="UTF-8"?>
<beans xmlns="http://www.springframework.org/schema/beans"
       xmlns:xsi="http://www.w3.org/2001/XMLSchema-instance"
       xsi:schemaLocation="http://www.springframework.org/schema/beans
        http://www.springframework.org/schema/beans/spring-beans.xsd">
    <!-- 配置实体类Account-->
    <bean id="account" class="entity.Account" scope="prototype"></bean>
<!--    配置DataConnectionUtil-->
    <bean id="dataConnectionUtil" class="util.DataConnectionUtil">
<!--        注入数据源DataSource-->
        <property name="dataSource" ref="dataSource"></property>
    </bean>
<!--    配置TransactionManager-->
    <bean id="transactionManager" class="util.TransactionManager">
<!--        注入DataConnectionUtil-->
        <property name="dataConnectionUtil" ref="dataConnectionUtil"></property>
    </bean>
<!--    配置BeanFactory,方便通过工厂方法获取增强后的AccountServiceImpl-->
        <bean id="beanFactory"  class="factory.BeanFactory" >
<!--            注入TransactionManager-->
            <property name="transactionManager" ref="transactionManager"></property>
<!--            注入AccountServiceImpl-->
            <property name="accountService" ref="accountService"></property>
        </bean>
<!--    通过beanFactory的AccountServiceInstance方法获取经过动态代理增强后的AccountServiceImpl-->
    <bean id="beanFactoryService" factory-bean="beanFactory" factory-method="AccountServiceInstance">
    </bean>
<!--    配置AccountDaoImpl-->
        <bean id="accountDao" class="dao.AccountDaoImpl">
<!--            注入queryRunner-->
         <property name="queryRunner" ref="queryRunner"></property>
<!--            注入dataConnectionUtil-->
        <property name="dataConnectionUtil" ref="dataConnectionUtil"></property>
        </bean>
<!--    配置AccountServiceImpl-->
    <bean id="accountService" class="service.AccountServiceImpl">
<!--        注入accountDao-->
        <property name="accountDao" ref="accountDao"></property>
    </bean>
<!--     配置QueryRunner-->
        <bean  id="queryRunner" class="org.apache.commons.dbutils.QueryRunner"> </bean>
<!--    配置c3p0的数据库ComboPooledDataSource-->
        <bean id="dataSource" class="com.mchange.v2.c3p0.ComboPooledDataSource">
<!--            数据库连接的用户名-->
            <property name="user" value="root"></property>
            <!--            数据库连接的驱动-->
            <property name="driverClass" value="com.mysql.cj.jdbc.Driver"></property>
            <!--            数据库连接的密码-->
            <property name="password" value="root"></property>
            <!--            数据库连接的URL-->
            <property name="jdbcUrl" value="jdbc:mysql://localhost:3306/springdemo?serverTimezone=UTC"></property>
        </bean>

</beans>
10.进行测试
package test;
import entity.Account;
import org.junit.jupiter.api.AfterEach;
import org.junit.jupiter.api.BeforeEach;
import org.junit.jupiter.api.Test;
import org.springframework.context.ApplicationContext;
import org.springframework.context.support.ClassPathXmlApplicationContext;
import service.AccountService;
import java.util.Date;
import java.util.List;
/**
* Classname:AccountTest
*
* @description:
* @author: 陌意随影
* @Date: 2020-08-01 17:39
* @Version: 1.0
**/
public class AccountTest {
private ApplicationContext applicationContext;
private AccountService accountService;
@BeforeEach
public void init(){
applicationContext = new ClassPathXmlApplicationContext("bean.xml");
System.out.println("启动");
}
@AfterEach
public void destroy(){
}
@Test
public void testSave(){
Account account = applicationContext.getBean("account", Account.class);
account.setAge(434);
account.setName("李四");
account.setPassword("打个卡的撒老顾客");
account.setCreateTime(new Date());
account.setMoney(1000);
AccountService accountService = applicationContext.getBean("accountService", AccountService.class);
boolean fla = accountService.saveAccount(account);
System.out.println("插入用户:"+fla);
}
@Test
public void testUpdate(){
Account account = applicationContext.getBean("account", Account.class);
account.setAge(77);
account.setName("站干啥");
account.setPassword("54545");
account.setCreateTime(new Date());
account.setId(3);
AccountService accountService = applicationContext.getBean("accountService", AccountService.class);
boolean fla = accountService.updateAccount(account);
System.out.println("更新用户:"+fla);
}
@Test
public void testDelete(){
Account account = applicationContext.getBean("account", Account.class);
account.setId(5);
AccountService accountService = applicationContext.getBean("accountService", AccountService.class);
boolean fla = accountService.deleteAccountById(account.getId());
System.out.println("删除用户:"+fla);
}
@Test
public void testFindOne(){
AccountService accountService = applicationContext.getBean("accountService", AccountService.class);
Account account1 = accountService.findAccountById(6);
System.out.println("查找单个用户"+account1);
}
@Test
public void testFindAll(){
AccountService accountService = applicationContext.getBean("accountService", AccountService.class);
List<Account> accountList = accountService.findAll();
for (Account a :accountList) {
System.out.println(a);
}
}
@Test
public void testTran1(){
//获取没有经过事务管理的普通AccountServiceImpl
AccountService accountService = applicationContext.getBean("accountService", AccountService.class);
accountService.tranferMoney(3,6,100);
}
@Test
public void testTran2(){
//获取通过动态代理增强后可进行事务管理的AccountServiceImpl
AccountService accountService = applicationContext.getBean("beanFactoryService", AccountService.class);
accountService.tranferMoney(3,6,100);
}
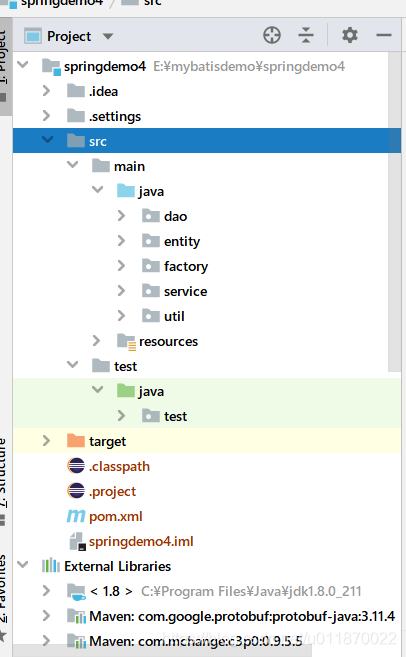
}完整的目录为: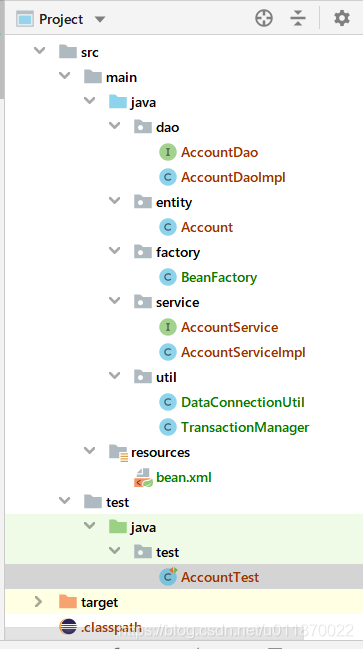
11.开始测试
11.1首先在数据库中插入两条数据: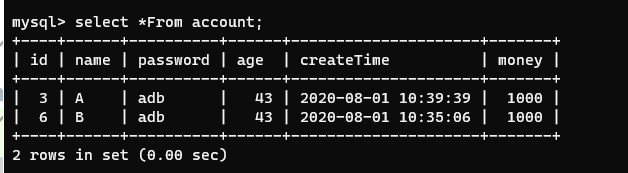
11.1首先测没有进行事务管理的 testTran1()测试转账运行正确的情况:
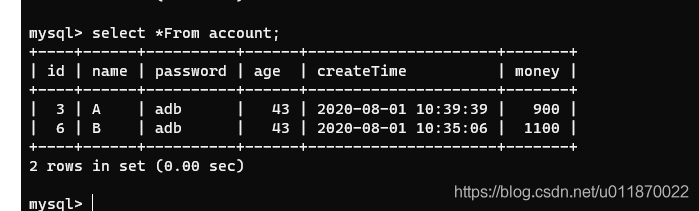
通过数据库查询可知转账正确。
再测试 testTran1()转账出现故障
首先在AccountServiceImpl中的tranferMoney(int sourceId, int targetId, int money)方法中模拟异常: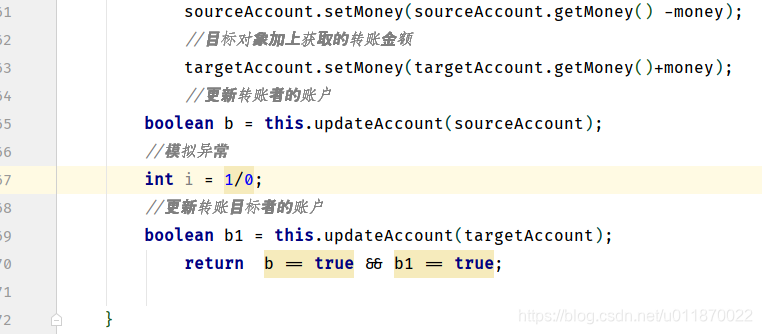
再启动进行测试: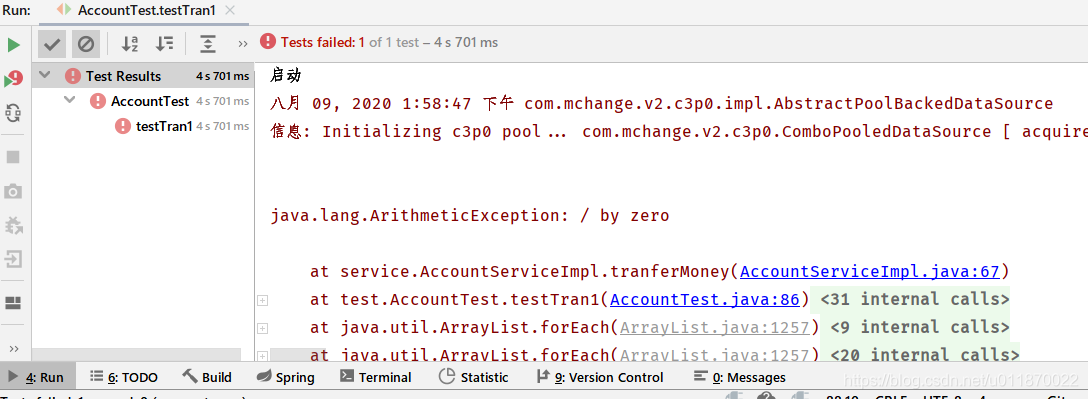
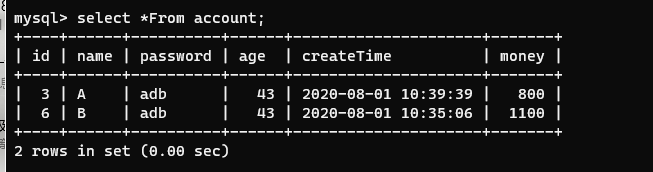
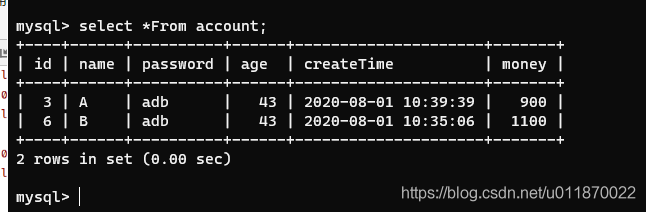
出现异常,转账失败,但是由于没有事务管理,所以A用户转账100给B用户,但是由于在转账的时候发生错误,所以A的钱减少了100,但是B的账户却没有相应增加100,这就出现了钱被银行给“吃了” 的情况。
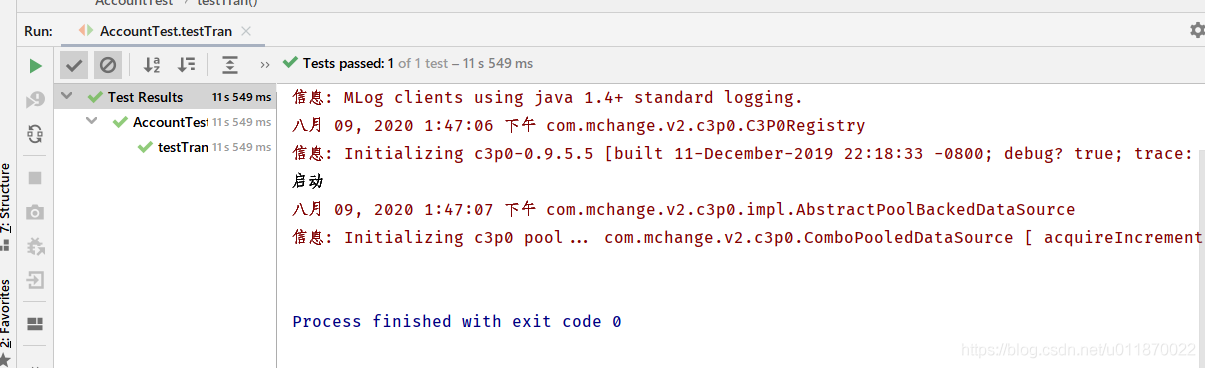
11.2进行测试testTran2()测试有事务管理的情况。
首先将数据库的用户的钱都设置为1000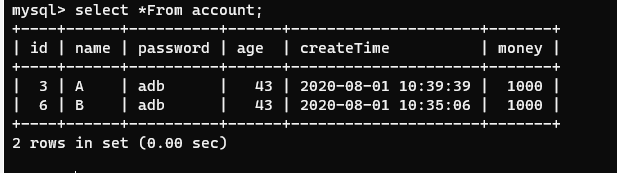
首先进行测试无异常的z转账: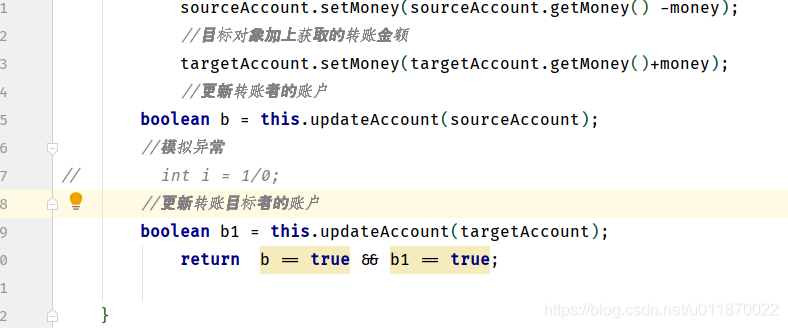
运行结果正确: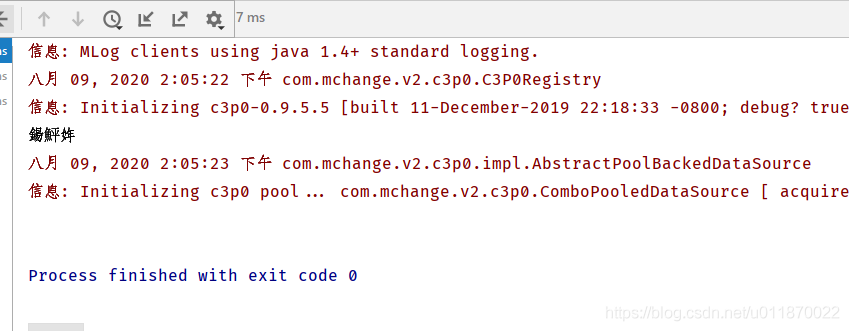
再测试有异常的情况:
运行测试: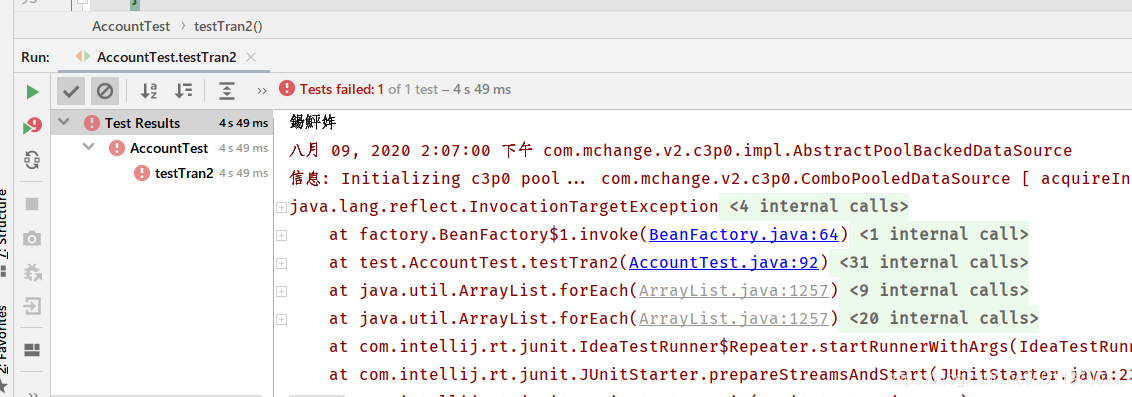
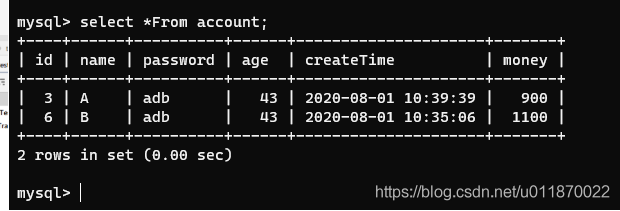
可见,在转账过程中,虽然出现了异常,但是A和B的钱都没有变,这就说明事务管理起了作用,从而使得数据库操作变得安全。
12.本次项目代码已经上传到个人服务器,如有需要请自行下载解压后导入idea:http://moyisuiying.com/wp-content/uploads/2020/08/springdemo4.rar