


在之前的文章,笔者已经使用XML配置实现了对MySQL的事务管理使用Spring的事务管理器配置数据库的事务,Spring也支持使用注解进行配置从而实现对事务的管理,此次便详细说明如何使用注解配置实现Spring事务的管理。
1.首先建立实验测试环境
1.1创建数据库以及数据表Account。
create database if not exists springdemo;
use springdemo;
create table if not exists Account(id int(4) auto_increment primary key,name varchar(16) not null,password varchar(16) not null,age int(3) ,createtime datetime default now(),money int(8));
1.2在idea中建立maven工程。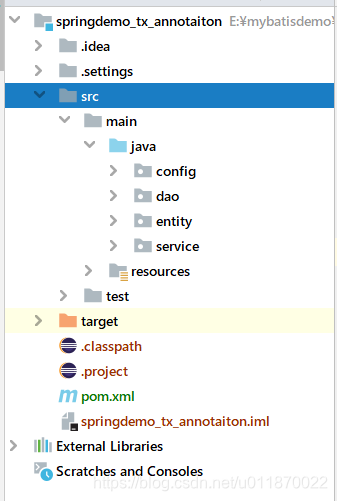
1.3在pom.xml中引入必须的依赖文件
<?xml version="1.0" encoding="UTF-8"?>
<project xmlns="http://maven.apache.org/POM/4.0.0"
         xmlns:xsi="http://www.w3.org/2001/XMLSchema-instance"
         xsi:schemaLocation="http://maven.apache.org/POM/4.0.0 http://maven.apache.org/xsd/maven-4.0.0.xsd">
    <modelVersion>4.0.0</modelVersion>
    <groupId>org.example</groupId>
    <artifactId>springdemo_tx_annotaiton</artifactId>
    <version>1.0-SNAPSHOT</version>
    <properties>
        <project.build.sourceEncoding>UTF-8</project.build.sourceEncoding>
        <maven.compiler.source>1.8</maven.compiler.source>
        <maven.compiler.target>1.8</maven.compiler.target>
        <spring.version>5.2.8.RELEASE</spring.version>
    </properties>
    <dependencies>
<!--        引入Spring依赖-->
        <dependency>
            <groupId>org.springframework</groupId>
            <artifactId>spring-context</artifactId>
            <version>${spring.version}</version>
        </dependency>
        <dependency>
            <groupId>org.springframework</groupId>
            <artifactId>spring-jdbc</artifactId>
            <version>${spring.version}</version>
        </dependency>
        <dependency>
            <groupId>org.springframework</groupId>
            <artifactId>spring-tx</artifactId>
            <version>${spring.version}</version>
        </dependency>
        <!-- 引入MySQL依赖 -->
        <dependency>
            <groupId>mysql</groupId>
            <artifactId>mysql-connector-java</artifactId>
            <version>8.0.21</version>
        </dependency>
        <!-- 引入c3p0依赖-->
        <dependency>
            <groupId>com.mchange</groupId>
            <artifactId>c3p0</artifactId>
            <version>0.9.5.5</version>
        </dependency>
<!--        引入测试依赖-->
        <dependency>
            <groupId>org.junit.jupiter</groupId>
            <artifactId>junit-jupiter</artifactId>
            <version>RELEASE</version>
            <scope>test</scope>
        </dependency>

    </dependencies>

</project>
1.4创建数据库连接配置文件db.properties
jdbc.url=jdbc:mysql://localhost:3306/springdemo?serverTimezone=UTC
jdbc.name=root
jdbc.password=root
jdbc.driver=com.mysql.cj.jdbc.Driver
2.开始书写dao,entity,service包下的代码。
2.1创建实体类
package entity;

import org.springframework.context.annotation.Scope;
import org.springframework.stereotype.Repository;

import java.util.Date;

/**
 * Classname:Account
 *
 * @description:
 * @author: 陌意随影
 * @Date: 2020-08-01 17:33
 * @Version: 1.0
 **/
@Repository("account")
@Scope("prototype")
public class Account {
    //用户主键ID
    private int id;
    //用户名
    private String name;
    //用户密码
    private String password;
    //用户年龄
    private int age;
    //用户创建时间
    private Date createTime ;
    //用户的余额
    private int money;

    public int getMoney() {
        return money;
    }

    public void setMoney(int money) {
        this.money = money;
    }

    public int getId() {
        return id;
    }

    public void setId(int id) {
        this.id = id;
    }

    public String getName() {
        return name;
    }

    public void setName(String name) {
        this.name = name;
    }

    public String getPassword() {
        return password;
    }

    public void setPassword(String password) {
        this.password = password;
    }

    public int getAge() {
        return age;
    }

    public void setAge(int age) {
        this.age = age;
    }

    public Date getCreateTime() {
        return createTime;
    }

    public void setCreateTime(Date createTime) {
        this.createTime = createTime;
    }

    @Override
    public String toString() {
        return "Account{" +
                "id=" + id +
                ", name='" + name + '\'' +
                ", password='" + password + '\'' +
                ", age=" + age +
                ", createTime=" + createTime +
                ", monney=" + money +
                '}';
    }
}
2.2创建用和访问数据库的持久层接口以及其实现类
package dao;

import entity.Account;

import java.util.List;

/**
 * Classname:springdemo3
 *
 * @description:{description}
 * @author: 陌意随影
 * @Date: 2020-08-01 17:32
 */
public interface AccountDao {
    /**
     * @Description :保存用户
     * @Date 11:51 2020/8/9 0009
     * @Param * @param account :
     * @return boolean
     **/
    public boolean saveAccount(Account account);
    /**
     * @Description :更新用户
     * @Date 11:51 2020/8/9 0009
     * @Param * @param newAccount :
     * @return boolean
     **/
    public boolean updateAccount(Account newAccount);
    /**
     * @Description :通过ID删除用户
     * @Date 11:52 2020/8/9 0009
     * @Param * @param id :
     * @return boolean
     **/
    public boolean deleteAccountById(int id);
    /**
     * @Description :通过ID查询用户
     * @Date 11:52 2020/8/9 0009
     * @Param * @param id :
     * @return entity.Account
     **/
    public Account findAccountById(int id);
    /**
     * @Description :查找所有用户
     * @Date 11:52 2020/8/9 0009
     * @Param * @param  :
     * @return java.util.List<entity.Account>
     **/
    public List<Account> findAll();
}
package dao;
import entity.Account;
import org.springframework.beans.factory.annotation.Autowired;
import org.springframework.jdbc.core.BeanPropertyRowMapper;
import org.springframework.jdbc.core.JdbcTemplate;
import org.springframework.stereotype.Repository;
import java.util.List;
/**
* Classname:AccountDaoImpl
*
* @description:AccountDao的实现类
* @author: 陌意随影
* @Date: 2020-08-01 17:32
* @Version: 1.0
**/
@Repository("accountDao")
public class AccountDaoImpl implements AccountDao {
//用于进行MySQL增删查改,自动注入
@Autowired
JdbcTemplate jdbcTemplate = null;
/**
* @Description :保存用户
* @Date 12:17 2020/8/9 0009
* @Param * @param newAccount :
* @return boolean
**/
public boolean saveAccount(Account newAccount) {
return jdbcTemplate.update("insert into account(name,password,age,createTIme,money) values(?,?,?,?,?)",
newAccount.getName(),newAccount.getPassword(),
newAccount.getAge(),newAccount.getCreateTime(),newAccount.getMoney())== 1;
}
/**
* @Description :更新用户
* @Date 12:18 2020/8/9 0009
* @Param * @param newAccount :
* @return boolean
**/
public boolean updateAccount(Account newAccount) {
return jdbcTemplate.update("update account set name=?,password=?,age=?,createTime=?,money=? where id=?",
newAccount.getName(),newAccount.getPassword(),
newAccount.getAge(),newAccount.getCreateTime(),newAccount.getMoney(),newAccount.getId())==1;
}
/**
* @Description :通过ID删除用户
* @Date 12:18 2020/8/9 0009
* @Param * @param id :
* @return boolean
**/
public boolean deleteAccountById(int id) {
return jdbcTemplate.update("delete from account where id=?",id) == 1;
}
/**
* @Description :通过ID查询用户
* @Date 11:02 2020/8/9 0009
* @Param * @param id :
* @return entity.Account
**/
public Account findAccountById(int id) {
List<Account> list = jdbcTemplate.query("select* from account where id=?", new BeanPropertyRowMapper<Account>(Account.class), id);
if (list.isEmpty()){
return null;
}
if (list.size()==1){
return list.get(0);
}
return null;
}
/**
* @Description :查询所有哟用户
* @Date 11:01 2020/8/9 0009
* @Param * @param :
* @return java.util.List<entity.Account>
**/
public List<Account> findAll() {
return jdbcTemplate.query("select* from account",new BeanPropertyRowMapper<Account>(Account.class));
}
}用于访问数据库的JdbcTemplate需要自动注入,等会再在配置类中配置这个JdbcTemplate用于注入。
2.3书写业务逻辑接口以及其实现类
package service;

import entity.Account;

import java.util.List;

/**
 * Classname:springdemo3
 *
 * @description:{description}
 * @author: 陌意随影
 * @Date: 2020-08-01 17:35
 */
public interface AccountService {
        /**
         * @Description :保存用户
         * @Date 11:51 2020/8/9 0009
         * @Param * @param account :
         * @return boolean
         **/
        public boolean saveAccount(Account account);
        /**
         * @Description :更新用户
         * @Date 11:51 2020/8/9 0009
         * @Param * @param newAccount :
         * @return boolean
         **/
        public boolean updateAccount(Account newAccount);
        /**
         * @Description :通过ID删除用户
         * @Date 11:52 2020/8/9 0009
         * @Param * @param id :
         * @return boolean
         **/
        public boolean deleteAccountById(int id);
        /**
         * @Description :通过ID查询用户
         * @Date 11:52 2020/8/9 0009
         * @Param * @param id :
         * @return entity.Account
         **/
        public Account findAccountById(int id);
        /**
         * @Description :查找所有用户
         * @Date 11:52 2020/8/9 0009
         * @Param * @param  :
         * @return java.util.List<entity.Account>
         **/
        public List<Account> findAll();
   /**
    * @Description :从用户ID为sourceId的用户向用户ID为targetId的用户转账money
    * @Date 11:55 2020/8/9 0009
    * @Param * @param sourceId
    * @param targetId
    * @param money :
    * @return boolean
    **/
    public boolean tranferMoney(int sourceId,int targetId,int money);
}
java
package service;
import dao.AccountDao;
import entity.Account;
import org.springframework.beans.factory.annotation.Autowired;
import org.springframework.stereotype.Service;
import org.springframework.transaction.annotation.Isolation;
import org.springframework.transaction.annotation.Propagation;
import org.springframework.transaction.annotation.Transactional;
import java.util.List;
/**
- Classname:AccountServiceImpl
- @description:
- @author: 陌意随影
- @Date: 2020-08-01 17:35
- @Version: 1.0
**/
@Service("accountService")
@Transactional(propagation= Propagation.SUPPORTS,readOnly=true)
public class AccountServiceImpl implements AccountService {
//用户数据可访问的Dao接口
@Autowired
private AccountDao accountDao;
@Transactional(isolation = Isolation.DEFAULT,propagation = Propagation.REQUIRED,readOnly = false)
public boolean saveAccount(Account account) {
return accountDao.saveAccount(account);
}
@Transactional(isolation = Isolation.DEFAULT,propagation = Propagation.REQUIRED,readOnly = false)
public boolean updateAccount(Account newAccount) {return accountDao.updateAccount(newAccount);}
@Transactional(isolation = Isolation.DEFAULT,propagation = Propagation.REQUIRED,readOnly = false)
public boolean deleteAccountById(int id) {
return accountDao.deleteAccountById(id);
}
@Transactional(isolation = Isolation.DEFAULT,propagation = Propagation.REQUIRED,readOnly = true)
public Account findAccountById(int id) {
return accountDao.findAccountById(id);
}
@Transactional(isolation = Isolation.DEFAULT,propagation = Propagation.REQUIRED,readOnly = true)
public List findAll() {
return accountDao.findAll();
}
/**- @Description :从用户ID为sourceId的用户向用户ID为targetId的用户转账money
- @Date 11:55 2020/8/9 0009
- @Param * @param sourceId
- @param targetId
- @param money :
- @return boolean
**/
@Transactional(isolation = Isolation.DEFAULT,propagation = Propagation.REQUIRED,readOnly = false)
public boolean tranferMoney(int sourceId, int targetId, int money) {
//获取sourceId对应的用户
Account sourceAccount = this.findAccountById(sourceId);
//获取targetId对应的用户
Account targetAccount = this.findAccountById(targetId);
//转账失败
if (sourceAccount == null || targetAccount == null) {
return false;
}
//转账者扣去转账的金额
sourceAccount.setMoney(sourceAccount.getMoney() -money);
//目标对象加上获取的转账金额
targetAccount.setMoney(targetAccount.getMoney()+money);
//更新转账者的账户
boolean b = this.updateAccount(sourceAccount);
//模拟异常
int i = 1/0;
//更新转账目标者的账户
boolean b1 = this.updateAccount(targetAccount);
return b == true && b1 == true;
}
AccountDao会自动被注入,我们要实现事务管理就是要在业务逻辑中进行事务管理,因此需要在AccountServiceImpl中添加@Transactional注解。
**3.@Transactional 基于 Spring 的动态代理的机制**
3.1@Transactional 实现原理:
(1)事务开始时,通过AOP机制,生成一个代理connection对象,
并将其放入 DataSource 实例的某个与 DataSourceTransactionManager 相关的某处容器中。 在接下来的整个事务中,客户代码都应该使用该 connection 连接数据库, 执行所有数据库命令。 如果不使用该 connection 连接数据库执行的数据库命令,那么在本事务回滚的时候得不到回滚,从而无法实现事务的管理。物接 connection 逻辑上新建一个会话session,DataSource 与 TransactionManager 配置相同的数据源.
(2) 事务结束时,回滚在第1步骤中得到的代理 connection 对象上执行的数据库命令, 然后关闭该代理 connection 对象。事务结束后,回滚操作不会对已执行完毕的SQL操作命令起作用.
3.2事务的两种开启方式:
(1)显示开启 start transaction | begin,通过 commit | rollback 结束事务 (2)关闭数据库中自动提交 autocommit set autocommit = 0, MySQL 默认开启自动提交;通过手动提交或执行回滚操作来结束事务.
3.3事务的隔离级别:是指若干个并发的事务之间的隔离程度
3.3.1. @Transactional(isolation = Isolation.READ_UNCOMMITTED):读取未提交数据(会出现脏读, 不可重复读) 基本不使用.
3.3.2. @Transactional(isolation = Isolation.READ_COMMITTED):读取已提交数据(会出现不可重复读和幻读).
3.3.3. @Transactional(isolation = Isolation.REPEATABLE_READ):可重复读(会出现幻读).
3.3.4. @Transactional(isolation = Isolation.SERIALIZABLE):串行化.
3.4事务传播行为:如果在开始当前事务之前,一个事务上下文已经存在,此时有若干选项可以指定一个事务性方法的执行行为.
3.4.1. TransactionDefinition.PROPAGATION_REQUIRED:
如果当前存在事务,则加入该事务;如果当前没有事务,则创建一个新的事务。这是默认值。
3.4.2. TransactionDefinition.PROPAGATION_REQUIRES_NEW:
创建一个新的事务,如果当前存在事务,则把当前事务挂起。
3.4.3. TransactionDefinition.PROPAGATION_SUPPORTS:
如果当前存在事务,则加入该事务;如果当前没有事务,则以非事务的方式继续运行。
3.4.4. TransactionDefinition.PROPAGATION_NOT_SUPPORTED:
以非事务方式运行,如果当前存在事务,则把当前事务挂起。
3.4.5. TransactionDefinition.PROPAGATION_NEVER:
以非事务方式运行,如果当前存在事务,则抛出异常。
3.4.6. TransactionDefinition.PROPAGATION_MANDATORY:
如果当前存在事务,则加入该事务;如果当前没有事务,则抛出异常。
3.4.7. TransactionDefinition.PROPAGATION_NESTED:
如果当前存在事务,则创建一个事务作为当前事务的嵌套事务来运行;
如果当前没有事务,则该取值等价于TransactionDefinition.PROPAGATION_REQUIRED。
**3.5Transactional属性配置**
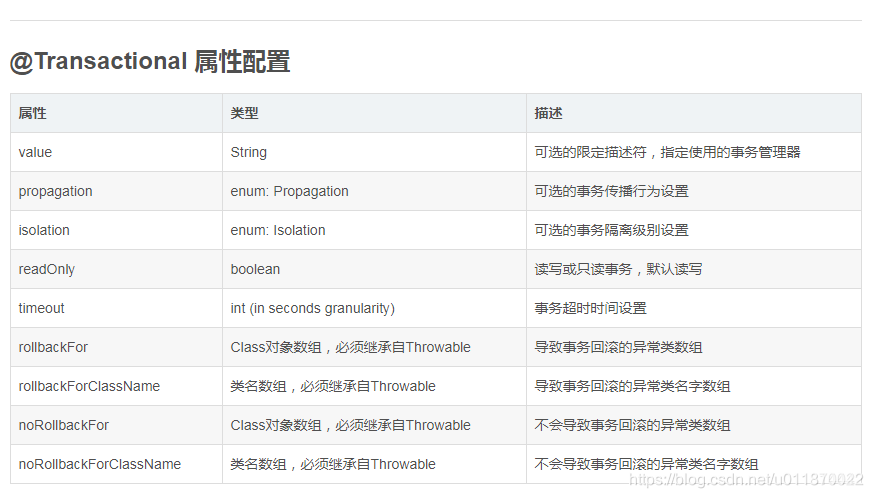
3.5.1. value :主要用来指定不同的事务管理器;
主要用来满足在同一个系统中,存在不同的事务管理器。
比如在Spring中,声明了两种事务管理器txManager1, txManager2.然后,
用户可以根据这个参数来根据需要指定特定的txManager.
3.5.2. value 适用场景:在一个系统中,需要访问多个数据源或者多个数据库,
则必然会配置多个事务管理器的
3.5.3. REQUIRED_NEW:内部的事务独立运行,在各自的作用域中,可以独立的回滚或者提交;
而外部的事务将不受内部事务的回滚状态影响。
3.5.4. ESTED 的事务,基于单一的事务来管理,提供了多个保存点。
这种多个保存点的机制允许内部事务的变更触发外部事务的回滚。
而外部事务在混滚之后,仍能继续进行事务处理,即使部分操作已经被混滚。
由于这个设置基于 JDBC 的保存点,所以只能工作在 JDB C的机制。
3.5.5. rollbackFor:让受检查异常回滚;即让本来不应该回滚的进行回滚操作。
3.5.6. noRollbackFor:忽略非检查异常;即让本来应该回滚的不进行回滚操作。
**4.书写配置文件类**
java
package config;
import org.springframework.context.annotation.*;
import org.springframework.transaction.annotation.EnableTransactionManagement;
/**
- Classname:SpringConfig
* - @description:
- @author: 陌意随影
- @Date: 2020-08-09 21:50
- @Version: 1.0
**/
@Configuration //声明是配置文件类
@ComponentScan({"dao","entity","service"})//指定要扫描的包
@EnableTransactionManagement //开启事务管理
@PropertySource("classpath:db.properties")//引入数据库配置的资源文件
@Import({JdbcConfig.class,TransactionConfig.class}) //引入指定的配置类
public class SpringConfig {
}
java
package config;
import com.mchange.v2.c3p0.ComboPooledDataSource;
import org.springframework.beans.factory.annotation.Value;
import org.springframework.context.annotation.Bean;
import org.springframework.jdbc.core.JdbcTemplate;
import javax.sql.DataSource;
/**
- Classname:JdbcConfig
* - @description:
- @author: 陌意随影
- @Date: 2020-08-09 21:53
- @Version: 1.0 / public class JdbcConfig { //自动从数据库配置文件db.properties中获取jdbc.driver对应的值来复制给driver @Value("${jdbc.driver}") private String driver; //自动从数据库配置文件db.properties中获取jdbc.name对应的值来复制给userName @Value("${jdbc.name}") private String userName; //自动从数据库配置文件db.properties中获取jdbc.password对应的值来复制给password @Value("${jdbc.password}") private String password; //自动从数据库配置文件db.properties中获取jdbc.url对应的值来复制给url @Value("${jdbc.url}") private String url; /
- @Description :使用Bean注解将创建的DataSource存入到Spring容器中方便使用
- @Date 22:22 2020/8/10 0010
- @Param * @param :
- @return javax.sql.DataSource
/ @Bean(name = "dataSource") public DataSource createDataSource(){ //创建一个c3p0数据库连接池数据源 ComboPooledDataSource comboPooledDataSource = new ComboPooledDataSource(); try { //设置数据库连接驱动 comboPooledDataSource.setDriverClass(driver); //设置数据库用户名 comboPooledDataSource.setUser(userName); //设置数据库连接密码 comboPooledDataSource.setPassword(password); //设置数据库的连接URL comboPooledDataSource.setJdbcUrl(url); return comboPooledDataSource; } catch (Exception e) { throw new RuntimeException("数据库配置出错!"); } } / - @Description :使用Bean注解将创建的JdbcTemplate存入到Spring容器中方便使用
- @Date 22:22 2020/8/10 0010
- @Param * @param DataSource:
- @return javax.sql.DataSource
**/
@Bean(name = "jdbcTemplate")
public JdbcTemplate createJdbcTemplate(DataSource dataSource){
return new JdbcTemplate(dataSource) ;
}
}
java
package config;
import org.springframework.context.annotation.Bean;
import org.springframework.jdbc.datasource.DataSourceTransactionManager;
import org.springframework.transaction.PlatformTransactionManager;
import javax.sql.DataSource;
/**
- Classname:TransactionConfig
* - @description:
- @author: 陌意随影
- @Date: 2020-08-09 22:11
- @Version: 1.0 / public class TransactionConfig { /
- @Description :从Spring容器中拿到配置好的DataSource,然话u根据传入的数据源DataSource创建事务管理对象
- PlatformTransactionManager并存入Spring容器中
- @Date 22:13 2020/8/9 0009
- @Param * @param dataSource :
- @return org.springframework.transaction.PlatformTransactionManager
**/
@Bean
public PlatformTransactionManager createTransactionManager(DataSource dataSource){
return new DataSourceTransactionManager(dataSource);
}
}
5.创建测试类java
package test;
import config.SpringConfig;
import entity.Account;
import org.junit.jupiter.api.AfterEach;
import org.junit.jupiter.api.BeforeEach;
import org.junit.jupiter.api.Test;
import org.springframework.context.ApplicationContext;
import org.springframework.context.annotation.AnnotationConfigApplicationContext;
import service.AccountService;
import java.util.Date;
import java.util.List;
/**
- Classname:AccountTest
* - @description:
- @author: 陌意随影
- @Date: 2020-08-01 17:39
- @Version: 1.0
**/
public class AccountTest {
private ApplicationContext applicationContext;
private AccountService accountService;
@BeforeEach
public void init(){
applicationContext = new AnnotationConfigApplicationContext(SpringConfig.class);
}
@AfterEach
public void destroy(){ }
@Test
public void testSave(){
Account account = applicationContext.getBean("account", Account.class);
account.setAge(434);
account.setName("李四");
account.setPassword("打个卡的撒老顾客");
account.setCreateTime(new Date());
account.setMoney(1000);
AccountService accountService = applicationContext.getBean("accountService", AccountService.class);
boolean fla = accountService.saveAccount(account);
System.out.println("插入用户:"+fla);
}
@Test
public void testUpdate(){
Account account = applicationContext.getBean("account", Account.class);
account.setAge(77);
account.setName("站干啥");
account.setPassword("54545");
account.setCreateTime(new Date());
account.setId(3);
AccountService accountService = applicationContext.getBean("accountService", AccountService.class);
boolean fla = accountService.updateAccount(account);
System.out.println("更新用户:"+fla);
}
@Test
public void testDelete(){
Account account = applicationContext.getBean("account", Account.class);
account.setId(5);
AccountService accountService = applicationContext.getBean("accountService", AccountService.class);
boolean fla = accountService.deleteAccountById(account.getId());
System.out.println("删除用户:"+fla);
}
@Test
public void testFindOne(){
AccountService accountService = applicationContext.getBean("accountService", AccountService.class);
Account account1 = accountService.findAccountById(6);
System.out.println("查找单个用户"+account1);
}
@Test
public void testFindAll(){
AccountService accountService = applicationContext.getBean("accountService", AccountService.class);
List accountList = accountService.findAll();
for (Account a :accountList) {
System.out.println(a);}}
@Test
public void testTran(){
//获取没有经过事务管理的普通AccountServiceImpl
AccountService accountService = applicationContext.getBean("accountService", AccountService.class);
accountService.tranferMoney(3,6,100);
}
}
```
创建好后就可以进行测试。
6.本次实验代码已经上传到个人博客,如有需要请自行移步下载(下载后解压导入idea的maven工程即可):http://moyisuiying.com/wp-content/uploads/2020/08/springdemo_tx_annotaiton.rar